Lolly Zheng- Sales Account Manager at NextPCB.com

 NextPCB Capabilities
Printed Circuit Boards
NextPCB Capabilities
Printed Circuit Boards
 PCB Assembly
 Layer Buildup
 SMD-Stencils
 PCB Design-Aid & Layout
 Mechanics
 Quality
 Drills & Throughplating
 Factory & Certificate
 PCB Assembly Factory Show
Certificate
PCB Assembly Factory Show
Certificate

Support Team
Feedback:
support@nextpcb.com


This is one of the first questions almost every hobbyist and early-stage engineer asks before starting a new project: ESP32 or Arduino? It's a slightly imprecise question by nature — "Arduino" is a brand and an ecosystem built around several different microcontroller families, while "ESP32" is one specific chip family from Espressif. In practice, when people ask this question, they almost always mean the classic Arduino boards: the Arduino UNO, Nano, and Mega, all built around Microchip's 8-bit AVR architecture. That's the comparison this article focuses on, and it's a genuinely useful one, because the AVR-based Arduino boards and the ESP32 represent two different eras and philosophies of hobbyist and professional embedded design.
This article compares them across the dimensions that actually matter for a project decision: architecture and processing power, real-time behavior, wireless connectivity, peripherals and I/O, power consumption, development tooling, PCB design implications, and cost. It ends with a decision framework — including the increasingly common case where the right answer is an ESP32 running inside the Arduino IDE, which blurs the line between the two more than the "ESP32 vs Arduino" framing suggests.
The Arduino project started in 2005 at the Interaction Design Institute Ivrea in Italy, with a simple goal: make microcontroller programming accessible to designers, artists, and students who had no electrical engineering background. The original Arduino boards used Microchip's (then Atmel's) AVR 8-bit microcontrollers, and the project's real contribution was never the chip itself — it was the IDE, the simplified C/C++ abstraction layer, and a board layout standard (the shield form factor) that made hardware experimentation approachable. That combination is why "Arduino" today refers as much to a development philosophy and toolchain as to any specific chip.
The ESP32, developed by Espressif Systems and released in 2016, was built around a different premise entirely: fold Wi-Fi and Bluetooth directly into a low-cost 32-bit SoC so that wireless connectivity stops being a separate hardware and certification problem. It wasn't originally designed with hobbyists in mind — it was designed as a production IoT chip. Its adoption by the Arduino IDE ecosystem (via the ESP32 Arduino core) came later, and that's precisely what makes the "ESP32 vs Arduino" comparison slightly unusual: an increasing share of ESP32 development actually happens inside the Arduino IDE, using Arduino-style setup() and loop() functions.
So the real comparison underneath the search query is: classic AVR-based Arduino boards (8-bit, no wireless, extremely simple) vs. the ESP32 (32-bit, dual-core, integrated Wi-Fi/BLE) — two hardware platforms with very different capabilities, that can both, confusingly, be programmed through the same IDE.
The classic Arduino UNO and Nano run on the ATmega328P, an 8-bit AVR microcontroller clocked at 16 MHz, delivering roughly 16 MIPS. There is no floating-point unit, no cache, and a single execution core. The Arduino Mega uses the ATmega2560, same architecture family, more I/O pins and memory, same clock speed. These are simple, well-understood, single-task-at-a-time processors — closer in spirit to embedded controllers from the 1990s than to a modern SoC, and that simplicity is exactly why they remain popular for teaching and for projects where the logic is genuinely simple.
The ESP32 uses a dual-core Xtensa LX6 (or LX7 on the S3, RISC-V on the C3/C6), clocked up to 240 MHz per core, delivering roughly 600 DMIPS combined — well over an order of magnitude more raw compute than the ATmega328P. It has 520 KB of internal SRAM versus the ATmega328P's 2 KB, and external SPI flash in the megabyte range versus the ATmega328P's 32 KB of program flash. For any task involving floating-point math, string/JSON processing, TLS handshakes, or running more than one concern at once (e.g., handling sensors while maintaining a network connection), this gap is not academic — it's the difference between "possible" and "not possible on this chip."
Not every ESP32 design needs the second core, and Espressif sells a single-core variant, the ESP32-SOLO-1, specifically for that case. It's the same Xtensa architecture and radio, minus the second CPU core — a sensible pick for projects that are single-threaded by nature anyway and don't want to pay for silicon they won't use, and a useful reminder that "ESP32" isn't one fixed spec any more than "Arduino" is.
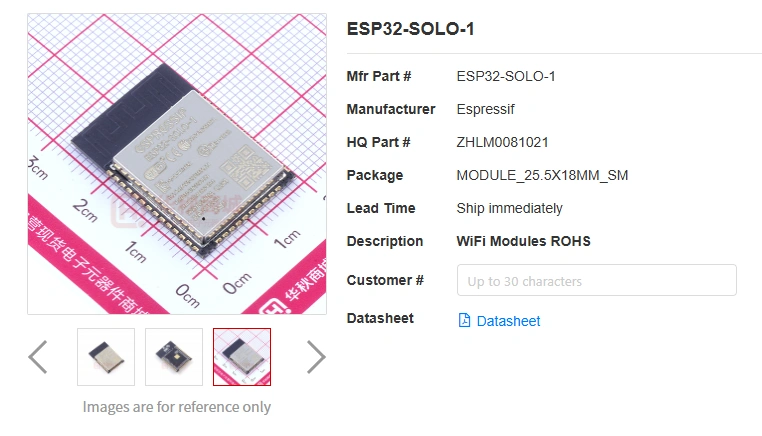
ESP32-SOLO-1: a single-core variant of the ESP32 for designs that don't need dual-core parallelism. (Source and datasheet on HQOnline)
| Parameter | Arduino UNO/Nano (ATmega328P) | Arduino Mega (ATmega2560) | ESP32 (standard) |
|---|---|---|---|
| Architecture | 8-bit AVR, single core | 8-bit AVR, single core | 32-bit Xtensa LX6, dual core |
| Clock speed | 16 MHz | 16 MHz | Up to 240 MHz |
| Approx. compute | ~16 MIPS | ~16 MIPS | ~600 DMIPS (both cores) |
| Hardware FPU | No | No | No (LX6); limited on S3 |
| SRAM | 2 KB | 8 KB | 520 KB |
| Program flash | 32 KB | 256 KB | External via SPI (4 MB+) |
| EEPROM | 1 KB | 4 KB | None (flash-emulated) |
It's worth being direct about what this means in practice: an ATmega328P-based Arduino cannot run a TCP/IP stack, TLS, and a webserver at the same time with any headroom to spare — this is not a matter of writing tighter code, it's a hard memory and clock ceiling. The ESP32 does this comfortably, with cycles left over. Conversely, for reading a button, debouncing it, and toggling an LED, the ESP32's extra compute is simply unused overhead — the ATmega328P is a complete, appropriately sized solution.
This is a category where the "obviously more powerful" ESP32 doesn't automatically win, and it's a common source of confusion for people moving from Arduino to ESP32 for the first time.
The ATmega328P's timing is simple and predictable precisely because it's doing one thing at a time with no scheduler in between. Digital I/O toggling via direct port manipulation can hit single-digit-microsecond consistency, and interrupt latency is fixed and well-documented. There's no RTOS, no second core stealing cycles, no Wi-Fi stack occasionally blocking the CPU. For bit-banging a simple protocol or generating tight, jitter-free pulse trains on a single pin, the AVR's simplicity is an advantage, not a limitation.
The ESP32 runs FreeRTOS under the hood — including when programmed through the Arduino IDE — and its loop() function is itself a FreeRTOS task competing with the Wi-Fi/Bluetooth stack, the watchdog, and other system tasks for CPU time. For the vast majority of projects this is invisible, but developers coming from bare-metal Arduino code are sometimes surprised the first time a delay() call or GPIO toggle has more jitter on ESP32 than they expected on classic Arduino, especially while Wi-Fi is active. Independent testing by embedded developers has put typical interrupt latency through the Arduino-ESP32 core at around 2 microseconds, which in practice caps reliable interrupt-driven signal handling at roughly 200 kHz — plenty for the vast majority of sensor and communication protocols, but a real ceiling worth knowing about before designing around software interrupts for something faster. The ESP32 does offer hardware timers, PWM (LEDC), and RMT (a purpose-built peripheral for precisely timed pulse sequences, originally designed for IR remote signals but widely repurposed for WS2812 LED strips and similar protocols) that provide genuinely precise timing when needed — the point isn't that ESP32 can't do precise timing, it's that precision comes from using the right peripheral rather than from the CPU's default behavior, the way it does on AVR.
| Real-Time Characteristic | Arduino (AVR) | ESP32 |
|---|---|---|
| Scheduler | None — bare-metal loop | FreeRTOS (present even under Arduino IDE) |
| Interrupt latency | Fixed, low, well-documented | Variable; can be affected by RTOS tasks and Wi-Fi activity |
| Precise pulse generation | Direct port manipulation, native timers | RMT peripheral, LEDC PWM, hardware timers |
| Predictability for bit-banging | High | Moderate — recommend hardware peripherals over software loops |
Classic Arduino boards have no wireless connectivity at all. Adding Wi-Fi, Bluetooth, or even simple RF requires an external module — an ESP8266/ESP32 as a Wi-Fi co-processor, an HC-05 for Bluetooth, or an nRF24L01 for proprietary 2.4 GHz links — each adding its own wiring, library, and (for Wi-Fi/Bluetooth) certification considerations. This is the single biggest practical driver behind "ESP32 vs Arduino" as a search query: the moment a project needs to talk to a phone or the internet, a plain AVR Arduino stops being sufficient on its own.
The ESP32 has Wi-Fi 802.11 b/g/n and dual-mode Bluetooth (Classic + BLE) built into the silicon, with no external transceiver or antenna design needed when using a pre-certified module (WROOM, MINI, etc.). This single fact accounts for most of the ESP32's popularity growth in the maker and IoT space over the last several years — projects that used to require an Arduino plus a separate Wi-Fi shield now just need one chip.
On wired I/O, the picture is closer: both platforms support I²C, SPI, and UART. Classic Arduino boards have no native USB device stack beyond the UART-to-USB bridge used for programming (with exceptions like the Arduino Leonardo/Micro, which use a USB-native ATmega32U4). The ESP32-S2 and S3 variants add native USB OTG support.
| Connectivity | Arduino (AVR, e.g. UNO/Nano) | ESP32 |
|---|---|---|
| Wi-Fi | ✗ External module required | ✓ Built-in |
| Bluetooth / BLE | ✗ External module required | ✓ Built-in (BLE 5.0; Classic on original ESP32) |
| I²C / SPI / UART | ✓ Available | ✓ Available |
| Native USB | ✗ (UNO/Nano); ✓ on Leonardo/Micro variant | ✓ On S2/S3 variants |
| RF pre-certification | Not applicable | ✓ Module variants (WROOM, MINI) simplify FCC/CE |
The Arduino UNO offers 14 digital I/O pins (6 with PWM) and 6 analog input channels at 10-bit ADC resolution. The Mega scales this up considerably — 54 digital I/O pins and 16 analog inputs — which is the main reason people reach for a Mega over a UNO: not more compute, just more physical pins for larger sensor/actuator arrays.
The ESP32 typically exposes around 34 GPIO pins at the chip level, with 12-bit ADC resolution across up to 18 channels split into two ADC units. In practice, fewer than 34 are freely usable on most boards: several pins are strapping pins that set the boot mode at power-up, and several more connect internally to the module's SPI flash (and PSRAM, on modules that include it) — using those for general I/O risks boot failures or memory corruption. The practically-available count on a typical ESP32 DevKit lands closer to 25, which is still substantially more than an Arduino UNO's 14 digital pins, but worth checking against the specific module's pinout rather than assuming the full 34 are free. One frequently overlooked constraint on the ADC side: ADC2 channels on the ESP32 cannot be reliably used while Wi-Fi is active, since the radio and ADC2 share internal circuitry — a project reading analog sensors while connected to Wi-Fi should be routed to ADC1 pins. The ESP32 also includes capacitive touch sensing pins and two 8-bit DAC outputs, neither of which classic Arduino boards have natively.
A second, less-discussed ADC caveat is worth flagging directly: the ESP32's SAR ADC is known to be non-linear near the top and bottom of its input range, and raw readings can vary chip-to-chip more than the AVR's ADC does. Espressif provides calibration APIs (using per-chip eFuse reference values) that correct most of this, but a design that skips calibration and expects clean linear counts will see more measurement error than the same job on an Arduino's 10-bit ADC. For applications where analog accuracy matters more than convenience — precision voltage or current sensing, for example — either use the ESP32's calibration API deliberately or add an external precision ADC over I²C/SPI rather than relying on raw ESP32 ADC counts.

Driving an external LED from any GPIO pin is typically the first hands-on ESP32 exercise, and it's identical in complexity to the equivalent Arduino UNO exercise — the extra 32-bit compute and wireless silicon sit idle and cost nothing in code complexity. See 10 ESP32 Projects for Beginners for the full walkthrough, from blinking an LED through Wi-Fi-connected sensor dashboards.
| Peripheral | Arduino UNO/Nano | Arduino Mega | ESP32 |
|---|---|---|---|
| Digital I/O pins | 14 | 54 | ~34 (module-dependent) |
| PWM-capable pins | 6 | 15 | Most pins via LEDC (software-assigned) |
| ADC resolution / channels | 10-bit, 6 ch. | 10-bit, 16 ch. | 12-bit, 18 ch. (ADC2 unavailable with Wi-Fi active) |
| DAC | None | None | 2 × 8-bit |
| Capacitive touch | None | None | Up to 10 pins |
| Hardware UART | 1 | 4 | 3 |
This is a hardware detail that trips up more first-time ESP32 users than any spec-sheet comparison: the ESP32 runs on 3.3V logic, while the classic Arduino UNO/Nano/Mega run on 5V logic. It's not just a supply-voltage difference — GPIO pins are only rated for 3.3V, and feeding a 5V signal into an ESP32 input pin directly can permanently damage it. The AVR-based Arduino boards, by contrast, interface natively with the large installed base of 5V sensors, relays, and logic-level shifters that have accumulated around the platform since 2005 without any extra components.
In practice this means an ESP32 design pulling in an older or 5V-only sensor needs a logic level shifter (a simple resistor divider works for unidirectional signals; a proper bidirectional level shifter IC is needed for I²C and other two-way buses) between the sensor and the ESP32's GPIO pins. This is a small, well-understood addition, but it's a real BOM line and a real design step that a same-scope Arduino UNO design skips entirely. Worth checking a sensor's datasheet for 3.3V-tolerant I/O before assuming a drop-in ESP32 replacement for an existing Arduino design.
This is a category that didn't really exist as a hobbyist-accessible use case until the ESP32-S3 generation, and it's now one of the more common reasons projects skip AVR-based Arduino entirely. The ESP32-S3 adds vector instructions that meaningfully speed up neural network inference, and ESP32-CAM-style modules pair a camera interface directly with the chip, enabling on-device tasks like basic object or face detection through frameworks such as ESP-WHO or TensorFlow Lite Micro. These are lightweight models constrained by the chip's memory — this is not a substitute for a GPU-based vision pipeline — but for tasks like presence detection, simple classification, or gesture recognition, it runs entirely on a few-dollar module with no cloud round-trip required.
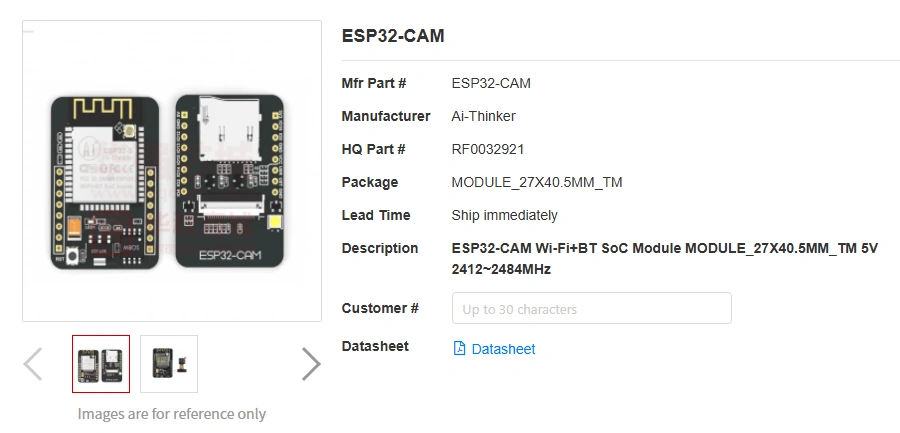
The ESP32-CAM (Ai-Thinker) pairs an ESP32 with a camera connector and microSD slot, and is the most common starting point for hobbyist edge-vision projects. (Source and datasheet on HQOnline)
Community projects built on this category now routinely cover on-device object detection, keyword-spotting voice recognition, and real-time gesture control — workloads that were simply not on the table for a hobbyist board a few years ago, and that remain entirely out of reach for an 8-bit AVR chip regardless of how the code is optimized.
Classic AVR-based Arduino boards have essentially no capacity for this category of work — 2 KB of SRAM doesn't leave room for a camera frame buffer, let alone a neural network. Arduino's own answer for TinyML-class projects is a different, ARM-based board entirely (the Nano 33 BLE Sense family), which underscores the same point made earlier: once a project's requirements exceed what an 8-bit AVR chip can do, the practical alternative increasingly is an ESP32 or an ARM-based board wearing the Arduino name, not a bigger AVR chip.
In active operation, a bare ATmega328P draws roughly 15–20 mA at 16 MHz — extremely low, and one reason AVR-based designs have such a long history in simple battery-powered products. In power-down sleep mode, current draw can fall to a few microamps.
The ESP32 draws considerably more in active mode — roughly 40–80 mA with the radio idle, and up to 160–500 mA in bursts with Wi-Fi transmitting. Its deep sleep current is around 5–10 μA, which is respectable but still higher than the AVR's power-down floor. Part of how the ESP32 keeps that sleep figure competitive is its Ultra-Low Power (ULP) co-processor, a small secondary core that can keep sampling a sensor or watching a GPIO for a wake condition while the main dual-core CPU stays fully powered down — something the AVR-based Arduino boards don't have an equivalent for out of the box.
One caveat worth flagging on real-world power comparisons circulating online: some widely-shared battery-life comparisons between the two platforms are less apples-to-apples than they look. A common pattern is measuring an Arduino UNO project that never actually calls its low-power sleep functions — the ATmega328P sits in active mode the entire time, drawing its full 15–20 mA continuously — against an ESP32 project that correctly cycles into deep sleep between readings. That comparison makes the power gap look enormous in the ESP32's favor, but it's really measuring "sleep implemented" against "sleep not implemented," not the chips themselves. A fair comparison puts both platforms into their actual lowest-power sleep mode: on that basis, the AVR's power-down mode and the ESP32's deep sleep are much closer, with the ESP32 pulling ahead specifically once periodic wireless transmission enters the picture.
For a battery project with no wireless requirement and years-long runtime targets, the AVR-based Arduino platform (or, in production, a bare AVR/low-power ARM chip without the Arduino board's onboard regulator and LED overhead) is generally the more power-efficient starting point. For a battery project that needs periodic Wi-Fi connectivity, the ESP32's sleep/wake cycling is the practical answer — there's no AVR + external Wi-Fi module combination that reliably beats it on power once the wireless requirement is fixed.
| Power Mode | Arduino (bare ATmega328P) | ESP32 |
|---|---|---|
| Active | ~15–20 mA @ 16 MHz | 40–80 mA (radio idle); 160–500 mA (Wi-Fi TX bursts) |
| Sleep | Low μA range (power-down mode) | ~5–10 μA (deep sleep) |
| Note | A full Arduino UNO board draws more than the bare chip due to onboard USB-serial converter, voltage regulator, and power LED | Module variants include flash and antenna, so their standby draw is higher than the bare SoC |
This is where the "vs." framing gets genuinely blurry. The Arduino IDE, Arduino-style setup()/loop() structure, and the enormous Arduino library ecosystem are not exclusive to AVR chips — they're the standard entry point for ESP32 development too, via the ESP32 Arduino core (built on top of Espressif's ESP-IDF). A developer moving from an Arduino UNO to an ESP32 board can often reuse a large share of their existing code and mental model, changing the board selection in the IDE and adapting pin numbers rather than learning an entirely new toolchain.
Where the ecosystems diverge is in ceiling, not floor. Classic Arduino development rarely goes beyond the Arduino IDE and its library manager — there's little need for anything more, given the hardware's simplicity. ESP32 development has more headroom: PlatformIO for more serious project structure, ESP-IDF directly for full access to FreeRTOS and low-level peripherals when the Arduino abstraction layer becomes limiting, and MicroPython as an alternative to C/C++ entirely. The community size for both platforms is very large, but the Arduino forums and documentation lean toward beginner-friendly troubleshooting, while ESP32-focused communities (esp32.com, Espressif's own forums, r/esp32) skew toward more IoT-specific and production-adjacent questions.
Designing around a bare ATmega328P (rather than buying an assembled Arduino board) is about as simple as through-hole/SMT microcontroller design gets: a handful of decoupling capacitors, a crystal (or use the internal RC oscillator for non-timing-critical designs), a reset pull-up, and an ICSP header or bootloader-based UART programming path. No RF layout, no antenna keep-out, no high-speed differential pairs. Two-layer boards are standard and sufficient for the overwhelming majority of AVR-based designs.
Designing around an ESP32 module introduces the same RF layout discipline covered in NextPCB's ESP32 vs STM32 comparison: a keep-out zone (typically ~15 mm) around the module's antenna on every copper layer, careful attention to ground pour near the RF section, and — for designs that break out to an external antenna via U.FL — controlled-impedance RF trace routing. Bare-chip ESP32 designs (rather than using a pre-certified module) add crystal, external SPI flash, and antenna matching network design, along with the certification burden that comes with rolling your own RF front end. For most hobbyist-to-small-production designs, using a pre-certified ESP32 module and respecting its antenna keep-out zone is the practical path, the same way it is for STM32-plus-Wi-Fi-module designs. For full pin-level layout guidance, see NextPCB's ESP32 pinout reference and ESP32 antenna design guide.
| PCB Design Factor | Bare ATmega328P (Arduino-class) | ESP32 (module) |
|---|---|---|
| Antenna keep-out zone | Not applicable | Required; ~15 mm on all layers |
| Crystal / oscillator | Optional (internal RC available) | Inside module |
| External flash | Not applicable (internal flash) | Inside module |
| Minimum recommended layers | 2 | 2 (module designs); 4 for bare-chip RF |
| Programming interface | ICSP header or UART bootloader | UART (auto-reset circuit common) or USB on S2/S3 |
Ready to take your microcontroller project to hardware?
Whether it's a simple AVR-based sensor board or an ESP32 IoT module with antenna keep-out to manage, NextPCB supports 2–20 layer fabrication and DFM review before production. Get an instant PCB prototype quote →
The theory above is easier to ground with a few real, fabricated examples of what a finished ESP32 design actually looks like once it leaves the breadboard stage.
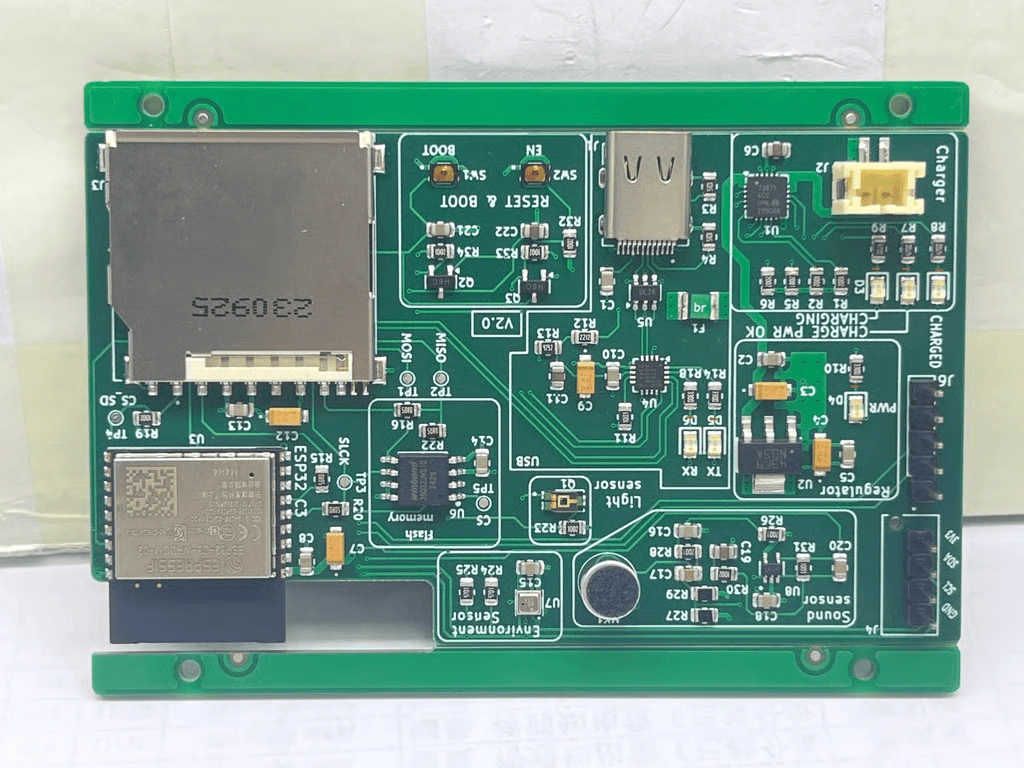
A well-executed ESP32 design usually goes well beyond a bare devkit once it's built around a specific application. One representative example: a compact environmental sensor board built around the smaller ESP32-C3, combining Wi-Fi/BLE connectivity with a BME280 environmental sensor, an ambient light sensor, and a pre-amplified microphone, alongside a microSD slot, SPI flash, USB-C charging with LiPo support, and onboard 3.3V/5V regulation — all on a 4-layer stack with dedicated test points for debugging.
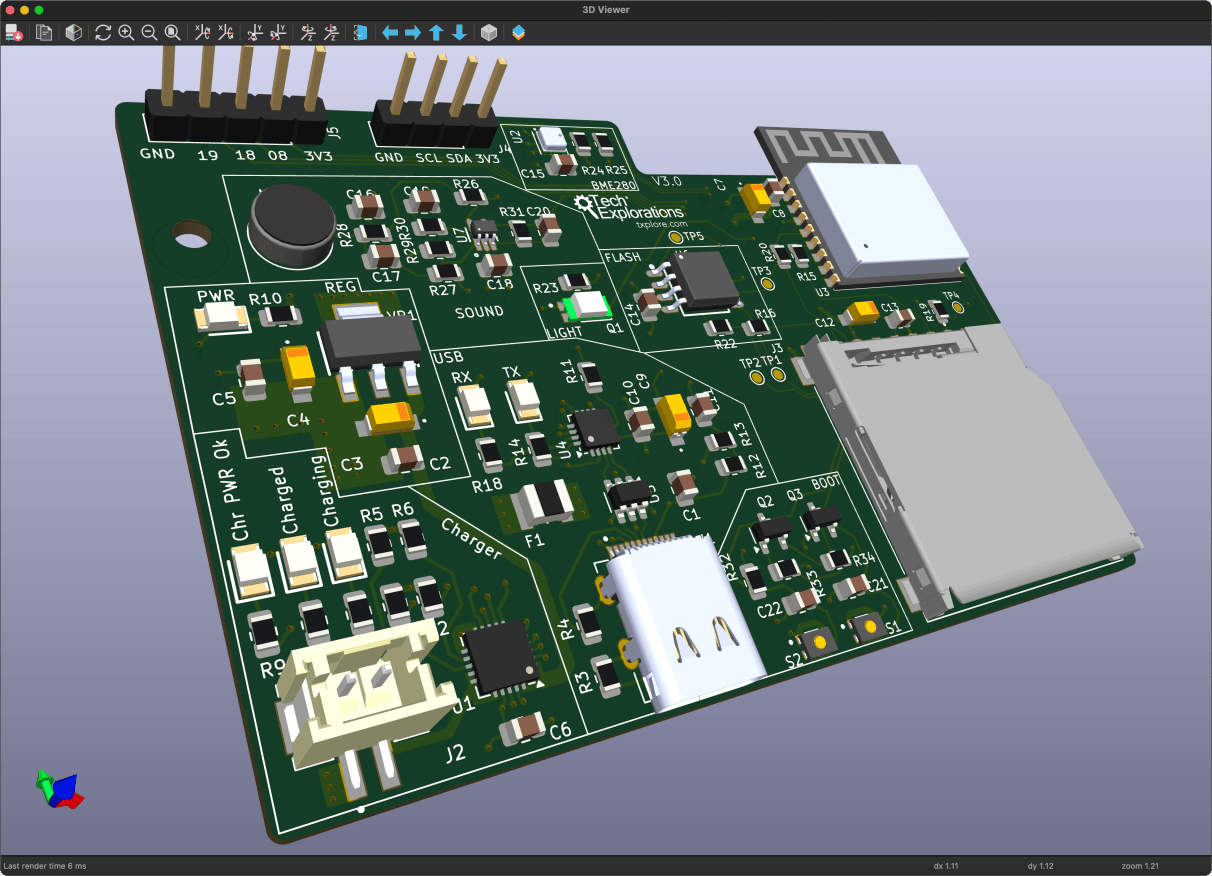
NextPCB's own Accelerator program, which sponsors free PCBA prototypes for community hardware projects, has fabricated several ESP32-based designs worth pointing to as further reference points.
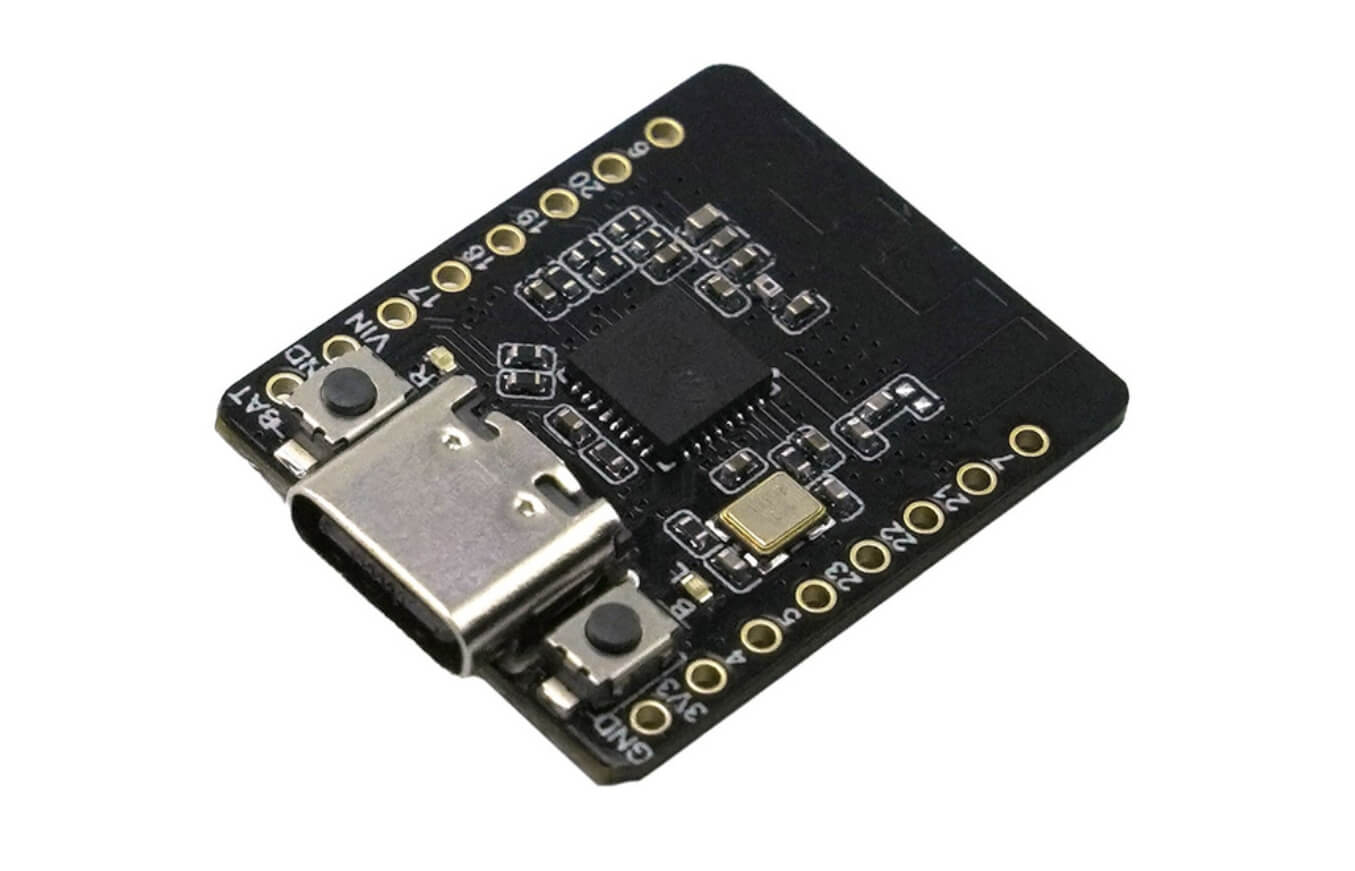
Also worth a look is the Beetle ESP32-C6, a compact RISC-V-based ESP32 board built for space-constrained wearable and sensor projects.

An official Arduino UNO board runs roughly $20–25 retail, while clone/compatible boards using the same ATmega328P are commonly available for $3–8. A bare ATmega328P chip in volume is typically under $2. The Arduino brand premium mainly buys documentation quality, board consistency, and community trust rather than hardware capability — for production designs, most teams move to the bare chip or a compatible module once past the prototyping stage.
ESP32 modules (WROOM and similar) have settled in the $2–4 range at volume, which is a notable data point: a wireless-enabled 32-bit SoC module now costs roughly the same as, or less than, an official non-wireless 8-bit Arduino board. This price convergence is a significant part of why ESP32 has displaced Arduino-plus-Wi-Fi-shield combinations in many new IoT designs over the past several years.
Supply chain-wise, the ATmega328P has decades of second-source and compatible-chip availability, making it one of the most resilient parts to source in volume. ESP32 is manufactured exclusively by Espressif, and while supply has been generally stable, it doesn't have the multi-decade, multi-vendor sourcing history that AVR chips do.
| Category | Arduino (AVR — UNO/Nano/Mega) | ESP32 |
|---|---|---|
| Architecture | 8-bit AVR, single core | 32-bit Xtensa (or RISC-V), dual core on most variants |
| Max clock | 16 MHz | Up to 240 MHz |
| Wi-Fi / Bluetooth | Not built-in | Built-in |
| Operating voltage / logic level | 5V | 3.3V (5V signals can damage GPIOs) |
| ADC resolution / linearity | 10-bit, stable and linear | 12-bit, but non-linear near range extremes without calibration (ADC2 also limited with Wi-Fi active) |
| SRAM | 2–8 KB | 520 KB |
| Real-time predictability | High (bare-metal, no scheduler) | Good, but shares CPU via FreeRTOS and radio activity |
| Active current | ~15–20 mA | 40–500 mA depending on radio activity |
| Primary IDE | Arduino IDE | Arduino IDE / ESP-IDF / PlatformIO / MicroPython |
| Learning curve | Very low — the original design goal | Low via Arduino core; steeper for full ESP-IDF features |
| Typical unit cost (module/board) | $3–25 depending on official vs. compatible | $2–4 (module, volume pricing) |
| Dominant use cases | Learning, simple automation, non-wireless sensor/actuator projects | IoT, connected prototypes, smart home, BLE devices |
Choose classic Arduino (AVR) when:
Choose ESP32 when:
The borderline cases: Educational settings where the syllabus specifically wants networking concepts taught alongside basic embedded programming often skip AVR entirely and start on ESP32 via the Arduino IDE, since the on-ramp is nearly as gentle. Battery-powered sensor nodes with no wireless requirement but a need for more analog channels than an AVR chip provides are a genuine toss-up between an ESP32 with Wi-Fi simply left unused and a low-power ARM chip outside the Arduino ecosystem altogether — worth evaluating against the specific power budget.
Arduino's own Nano ESP32 board is worth calling out specifically, because it undercuts the premise of "ESP32 vs. Arduino" as a strict either/or. It's an official Arduino-branded board built around Espressif's ESP32-S3, programmable through the standard Arduino IDE with the familiar Nano form factor and pinout family. For a developer who wants Arduino's beginner-friendly workflow and board ecosystem but needs the ESP32's compute and wireless capability, this board (and others like it from third parties, such as ESP32-based boards in the Nano/UNO form factor) removes the trade-off entirely rather than asking you to choose a side.
One practical wrinkle worth knowing before buying one: to preserve pin compatibility with the classic Nano form factor, the Nano ESP32's silkscreen and documentation label its pins with Arduino-style numbers (D0, D1, A0, and so on) rather than the chip's native ESP32-S3 GPIO numbers. Community write-ups building on this board have flagged that mixing the two numbering systems — for example, pulling a raw GPIO number from an ESP32 pinout diagram instead of the board's own Arduino-style label — produces confusing, hard-to-debug results under the Arduino framework. It's a documentation quirk rather than a hardware limitation, but worth checking the board's own pinout diagram specifically rather than a generic ESP32-S3 reference when wiring one up.
Arduino has moved in this direction even on its flagship UNO line: the Arduino UNO R4 replaces the ATmega328P with a Renesas RA4M1, an ARM Cortex-M4 running at 48 MHz — a real step up from classic AVR, though still well short of the ESP32's dual-core 240 MHz. The UNO R4 WiFi variant goes further and pairs that Renesas MCU with an onboard ESP32-S3 module purely to handle wireless connectivity, effectively building the "use both together" pattern into a single official board. This is a useful signal for how to read the whole comparison: Arduino as a brand is no longer synonymous with 8-bit AVR, even if that's still what "Arduino" means by default in casual usage and in most current tutorials.
This matters for the decision framework above: if the only reason to stay on classic AVR Arduino is "I want the Arduino workflow," that reason no longer forces a hardware compute ceiling. The remaining reasons to choose classic AVR specifically — lower active power, simpler bare-metal timing predictability, native 5V compatibility, lower unit cost at the bare-chip level — are the ones that actually hold up under an ESP32-based or ARM-based Arduino alternative.
From prototype to production — NextPCB handles both.
AVR-based sensor boards, ESP32 IoT modules, or a custom design combining both: NextPCB offers PCB fabrication, SMT assembly, BOM sourcing, and DFM review in one workflow. Get a free PCBA quote →
For most hobbyist and prototyping purposes, yes — ESP32 is a strict superset of what an AVR-based Arduino can do, plus wireless connectivity, at a comparable or lower module cost. The main reasons to still reach for AVR-based Arduino are teaching simplicity (no RTOS or scheduler to explain), slightly better active-mode power efficiency when wireless isn't needed, and the very large base of beginner-oriented tutorials and shields built around the UNO form factor specifically. For a first microcontroller project with no wireless requirement, either platform works; for anything that will eventually need to talk to a phone or the internet, starting on ESP32 avoids a later hardware change.
Often mostly, but not always without modification. Basic Arduino API calls (digitalWrite, analogRead, Serial, etc.) work the same way conceptually, but pin numbers differ by board, analog input behavior differs (12-bit vs. 10-bit ADC changes the reading range), and some AVR-specific libraries that rely on direct register access won't be portable since the underlying hardware registers are completely different. Libraries built specifically for ESP32 (Wi-Fi, BLE, LEDC PWM) have no AVR equivalent at all. Simple sketches usually port with minor edits; anything using low-level AVR register manipulation needs a rewrite.
Through the Arduino IDE, not meaningfully harder for basic projects — the setup()/loop() structure and most beginner tutorials look nearly identical on both platforms. The complexity difference shows up later: debugging Wi-Fi connection issues, understanding why a delay() call behaves slightly differently under FreeRTOS, or working with ESP32-specific peripherals like RMT or the touch sensor pins. For a true first project — blink an LED, read a button — the learning curve is comparable. For a first project that also needs to connect to a network, ESP32 is actually the easier path, since there's no separate Wi-Fi shield or module to add and wire up.
If the project has no wireless requirement, AVR-based Arduino (or more precisely, a bare ATmega328P without the Arduino board's onboard USB-serial chip and power LED) is more power-efficient in active mode and comparable in deep sleep. If the project needs periodic Wi-Fi or BLE connectivity, the comparison flips: an ESP32 cycling between deep sleep and brief wireless bursts will outperform any AVR-plus-external-Wi-Fi-module combination on total power budget, because the ESP32's radio integration avoids the overhead of a separate module's own power draw and communication latency.
The fundamentals — decoupling capacitors, clean ground return paths, sensible trace widths — are the same for both. The meaningful difference is RF: an ESP32 module design requires a strict antenna keep-out zone on every copper layer, which a bare AVR design never has to consider at all. Both benefit from a DFM review before fabrication, but the specific checks that matter differ — AVR designs are checked mainly for basic connectivity and power integrity, while ESP32 designs additionally need antenna clearance and (for high-density modules) impedance-controlled RF traces verified.
Not safely, in most cases. The ESP32's GPIO pins are rated for 3.3V, and a 5V signal applied directly to a pin can permanently damage the chip. A simple resistor-divider level shifter works for one-directional digital signals; I²C and other bidirectional buses need a proper bidirectional level shifter IC rather than a resistor divider. It's worth checking a sensor's datasheet — some modern sensor breakout boards already include onboard level shifting or accept a 3.3V–5V input range, in which case no extra hardware is needed.
Yes, meaningfully so. ESP32-CAM-style modules and the ESP32-S3 (which adds vector instructions for faster inference) can run lightweight on-device vision models — basic object or face detection, gesture recognition — using frameworks like ESP-WHO or TensorFlow Lite Micro. Classic AVR-based Arduino boards have nowhere near enough SRAM to buffer a camera frame, let alone run a neural network; Arduino's own answer for this category is a different, ARM-based board (the Nano 33 BLE Sense family), not a bigger AVR chip.

Still, need help? Contact Us: support@nextpcb.com
Need a PCB or PCBA quote? Quote now