Print circuit boards are slim, sturdy plastic boards that have a copper aluminum foil pattern bound to them. The aluminum foil forms connections in between digital components as well as make a circuit. Whether you have actually engraved as well as pierced your very own motherboard or you bought one as part of a set, construct it by putting components and also soldering them to the board. Along with placing the components in the best areas, some need cautious alignment prior to you can solder them.
Assemble motherboard Guidelines
- 1. Examine the motherboard. If the copper layer is not bright and also glossy yet shows up oxidized, scrub it under cool running water with a Scotch-Brite pad, after that completely dry it with a soft, lint-free towel.
- 2. Attach the antistatic wrist band's basing cord to a trustworthy planet ground such as the facility screw on an Air Conditioner electrical outlet plate or a steel channel pipeline. Place the band on your wrist.
- 3. Evaluation of the components list. Keep in mind the various type of components prepared for the board, consisting of incorporated circuits, transistors, resistors as well as ports.
- 4. Take the very first resistor on the list as well as flex its leads 90 levels about the body, so they are both aiming parallel. Discover the resistor's number on the element side of the board, which might be silk evaluated with white text.
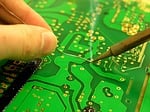
- 5. Insert the leads via the board as well as spread them out somewhat to maintain the part from befalling. Touch the pointer of the warm welding torch to the joint in between the lead and also pad, aftertouch completion of the solder to the warm joint and also allow a percentage of solder circulation onto the joint.
- 6. Get rid of the iron and also wait a minute to allow the joint to cool. Solder the various other lead similarly. Clip the extra leads with the angled cord-cutters. Inspect the resistor off on the list.
- 7. Likewise, solder all staying resistors to the board.
- 8. Take a diode or capacitor as well as note its alignment on the board. Some capacitors have a favorable and also unfavorable side and all diodes have a cathode and also anode that need to match an alignment mark on the board. Bend the element's leads, put it in its right alignment as well as solder it to the board. Clip off any kind of excess leads. Inspect it off on the list.
- 9. Take a transistor as well as note its positioning. These components have 3 leads, enthusiast, emitter and also base or resource, drainpipe, and also the entrance. You do not require to flex the leads prior to you put these components. Orient the transistor, area it as well as solder it to the board. Cut lead unwanted and also examine it off the list.
- 10. Take an incorporated circuit, if your job has one, as well as straighten it to the board. The incorporated circuit has a notch or various other alignment marks. Slide all the circuit's pins via the matching openings in the board. Hold the circuit in position as well as solder 2 pins at contrary edges of the incorporated circuit to maintain it from befalling. Solder the staying pins, doing a couple of each time and also enabling a min for the circuit to cool down prior to doing much more. Integrated circuit leads are short, so you do not require to cut them. Examine the incorporated circuit off the list.
- 11. Insert attaching cables to their appropriate places on the board, solder them, cut the excess as well as examine them off the list
Find NEXTPCB to quote PCB Assembly online !

 NextPCB Capabilities
 PCB Assembly
 Layer Buildup
 SMD-Stencils
 PCB Design-Aid & Layout
 Mechanics
 Quality
 Drills & Throughplating
 Factory & Certificate
 PCB Assembly Factory Show
Certificate
PCB Assembly Factory Show
Certificate


 Surface

