NextPCB Capabilities
Printed Circuit Boards
NextPCB Capabilities
Printed Circuit Boards
 PCB Assembly
 Layer Buildup
 SMD-Stencils
 PCB Design-Aid & Layout
 Mechanics
 Quality
 Drills & Throughplating
 Factory & Certificate
 PCB Assembly Factory Show
Certificate
PCB Assembly Factory Show
Certificate
Support Team
Feedback:
support@nextpcb.com


Introduction
The Raspberry Pi is arguably the most popular mini-computer in the market today. It is highly recommended if you want to start coding not only desktop applications but Internet of Things (IoT) apps as well. It has also found its way into gaming with its improving graphics support and in networking applications where the majority of systems are using Linux.
The first Raspberry Pi came out in 2012 in the UK. It was intended to teach young children how to code. This explains why using the Raspberry Pi doesn’t require advanced technical knowledge.
If you want to know how to make a Raspberry Pi, then this article is not for you. That is reserved for advanced users. For beginners, you actually buy it and not build a Raspberry Pi. This article will guide you on how to get started with Raspberry Pi.
How does the Raspberry Pi work? Well, the Raspberry Pi is a credit-card-sized computer that can run different kinds of operating systems. Basically, IT IS A COMPUTER with peripherals, memory, and a processing unit. But unlike a desktop or laptop, the Raspberry Pi has user-accessible General Purpose Input/Output pins or GPIO. These are 40 pins that can act as power source, data, or analog signal I/Os. You can connect LEDs, motors, sensors, and other sorts of peripherals.
If you want to know what is the Raspberry Pi used for, the answer would be: depends on your imagination. The inclusion of the GPIO header means it can control lights and motors, send a tweet, read the temperature, play video games, and many more!
Unlike the Arduino, the Raspberry Pi is a full-fledged personal computer. Being such, you pretty much need the same items as you would with a PC. Here are the things you need to get started:
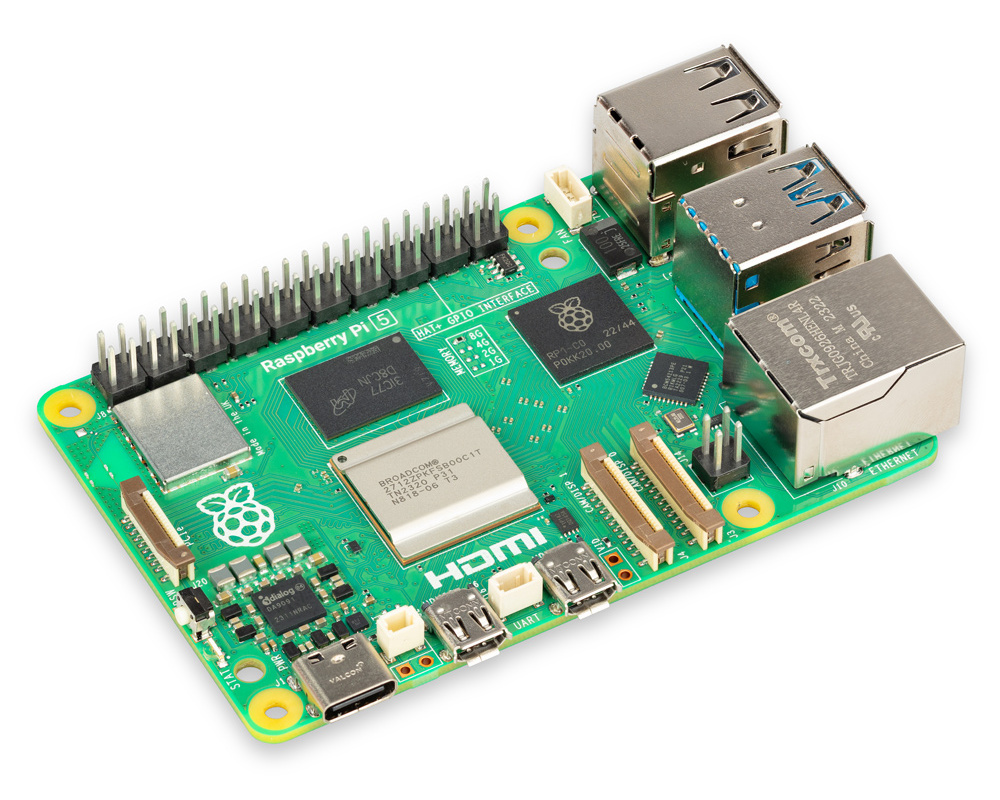
There are a lot of Raspberry Pi models that came out over the years. The choice of Raspberry Pi board depends on your intended application. If you believe that your application requires the best performance, choose the latest version, which is the Raspberry Pi 5. The Raspberry Pi 5 has the best CPU, RAM, and GPU among all versions. It is also the choice if you need to connect two monitors both rendering 4K resolution of videos.
Then you choose the amount of RAM that comes with the board. The choices are 4 GB and 8 GB. The general rule for choosing RAM is that the higher the value, the better. However, a higher RAM also costs more. If you plan to create an application that requires high processing speeds, then go for the higher RAM versions. If not, (especially if you’re a beginner), the 4 GB Model will suffice.
Image source: https://cdn.sparkfun.com//assets/parts/2/3/8/4/2/23551-raspberry-pi-5.jpg
If money is a consideration but processing power is still a factor then the Raspberry Pi 4 is for you, like the RPi 5, it can run two monitors although one of them can render 4K video. Its processing power is also enough to run most heavy applications including embedded image processing tasks. It also has two USB 3.0 ports if you need faster data transfer via USB and Bluetooth 5.0 if you require faster wireless data transfer.
Choosing the lesser Raspberry Pi 4 Model B is not a bad choice, really. It will still run the latest Raspbian OS with no issues. You have more RAM options for the RPi 4: 1 GB, 2 GB, 4 GB, and 8 GB. Again, the choice is the processing power that your application requires.
How about the Raspberry Pi 3B? Well, the gap in performance between the RPi 4 vs. the RPi 3B is so wide that it outweighs whatever the additional cost is to buy the former. Then again, if you’re looking for the cheapest option then go for the older RPi 3.
Choosing the Raspberry Pi 3B+ is only sensible if you have a limited budget. Despite its outdated hardware, it is still enough to run simpler applications. Beginners, who won’t require much processing power, might also opt for the cheaper Raspberry Pi 3.
Both the Raspberry Pi 5 and 4 require a 5V/5A DC power supply with a USB-C end. The Raspberry Pi 3 (and older versions) require a 5V/2.5A DC power supply with a microUSB end. The reason for newer models requiring more amperage is the higher power required by their CPU and GPU. This also means newer models consume more power over time -- another factor that you should consider before buying one. Make sure you buy the power supply with the correct rating to avoid powering issues with the Raspberry Pi. Also, beware of counterfeit power supplies as they might damage your Raspberry Pi board.
The red LED on the Raspberry Pi will tell you that it is receiving enough power. When it remains on the whole time, then the board is receiving enough power. If it blinks, then the voltage has gone down to the minimum required level. If the red LED is off, then the board has shut itself down.
microSD Card
The Raspberry Pi needs an operating system (OS) to run. That OS is not flashed into the RPi but is stored in an externally connected SD card. The first generation Raspberry Pi used the bigger SD card but has since been replaced with the smaller microSD card.
The choice of the capacity of the microSD card depends on the choice of OS. For the latest Raspbian OS, you’ll need at least 8 GB while for the Raspbian OS Lite, you’ll need at least 4 GB. Other types of OS might need more memory space. If you’re planning to regularly switch between different OS, go for a 32 GB microSD card. Also, if you’re installing NOOBS, prepare a higher-capacity memory card.
Next, you’ll need to burn the OS image into the microSD card. A number of users use Win32DiskImager for writing the image to the card. The official Raspberry Pi website recommends the latest Raspberry Pi Imager for installing an OS into the microSD card. More on installing an OS is down below.
Another option is to download NOOBS and have its contents saved into the card. Then, mount the card into the Raspberry Pi and power on the board. NOOBS will then present you with options as to which OS to install. The good thing about using NOOBS is that you don’t need to be online unlike the Raspberry Pi Imager. The disadvantage is that you’ll need a higher-capacity memory card if you choose to use NOOBS.
As already mentioned, the Raspberry Pi is a full-fledged personal computer. Hence, you still need a mouse, keyboard, and HDMI cable to connect to your monitor. You need a USB mouse and keyboard to be precise. If you have a Raspberry Pi 4 or 5, you can also use a Bluetooth mouse and keyboard. A wireless mouse and keyboard that uses a 2.5 GHz radio works too!
Also, the Raspberry Pi comes with two HDMI ports so you can use two monitors. For the Raspberry Pi 4, one of the two monitors may have a 4K resolution. For the Raspberry Pi 5, both monitors can render 4K. Take note that the Raspberry Pi 4 and 5 both use micro HDMI while the Raspberry Pi 3 uses full HDMI.
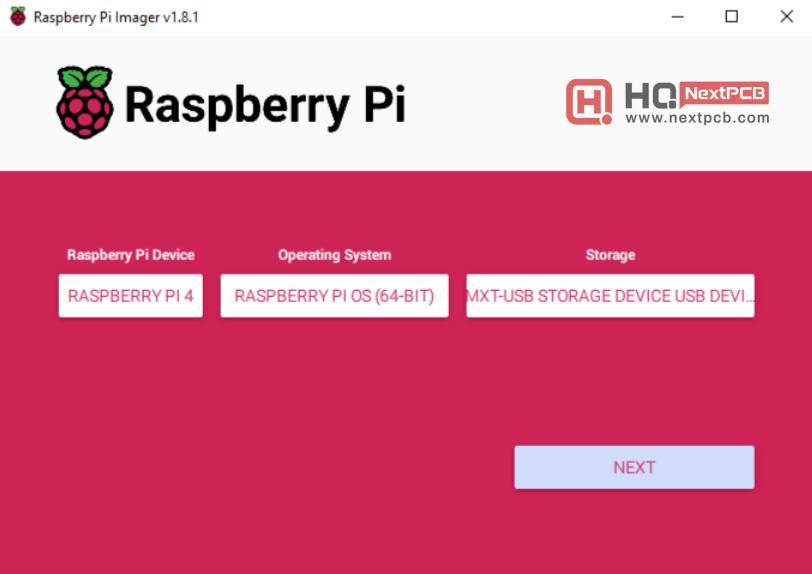
You’ll need a desktop application to burn your choice of operating system to the SD card. If you’re a legacy type of person, you’ll need to know how to install NOOBs on the Raspberry Pi. If you want the latest method, then go and download the Raspberry Pi Imager app.
Step 1: Select your Device, Operating System, and Storage:
Here I am using the Raspberry Pi OS 64-bit edition. My device is a Raspberry Pi 4 and the storage or memory card is connected to the USB port.
Here are other operating systems you can use:
There are also other customized OS that users have created over the years. You can even run the popular Android OS on the RPi!
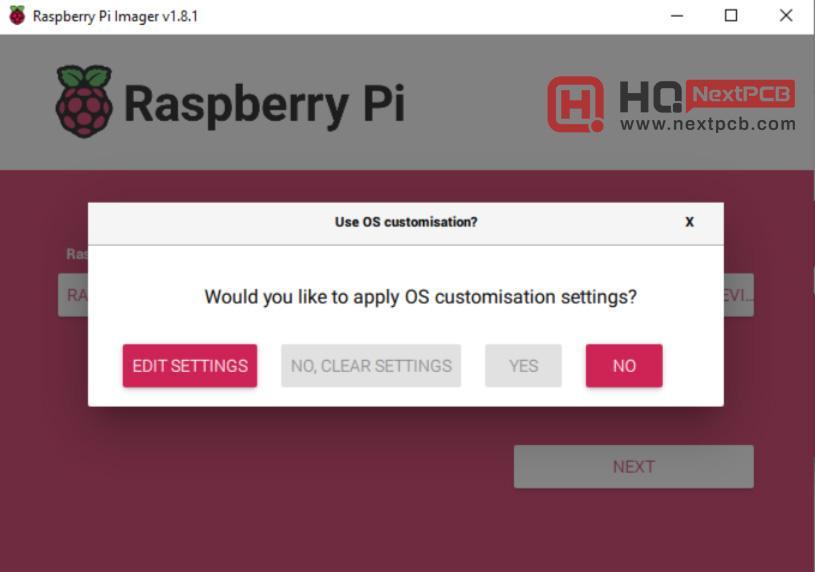
Step 2: Customize your Raspberry Pi Settings (or not?)
You can preconfigure your Raspberry Pi prior to burning your OS to the microSD card. By preconfiguring, this means you can set up your username and password, choose which WiFi to connect to, or enable SSH.
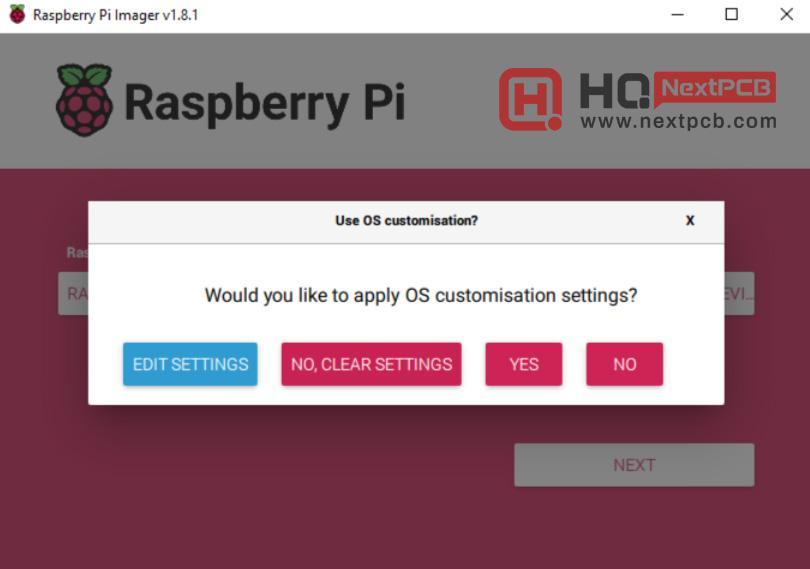
When you see the screen above, choose “Edit Settings”. If you’d rather configure the Raspberry Pi once the microSD card is mounted to it, then just select “No”.
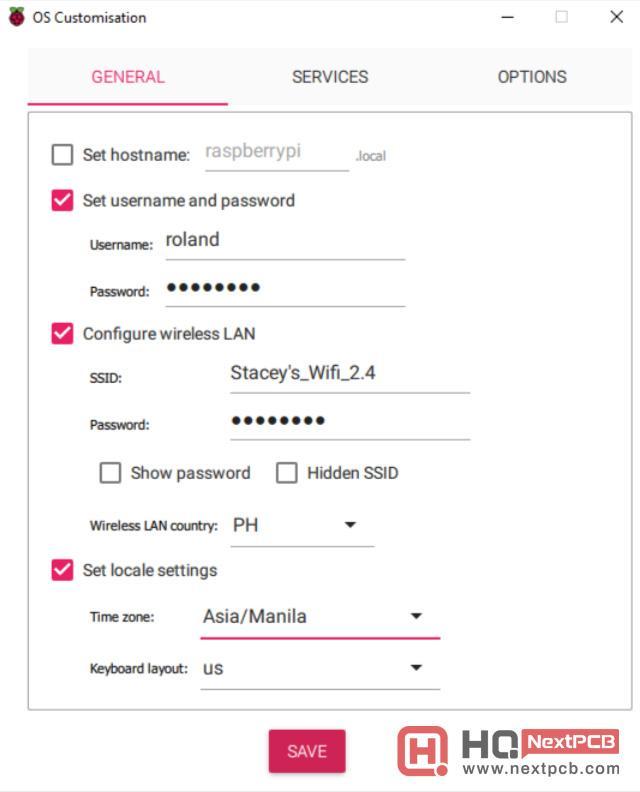
You can change your hostname in the “General” tab. The hostname is used to connect to your Raspberry Pi via SSH or VNC. The default is raspberrypi.local. An alternative to the hostname is the IP address. The IP address is typically assigned by your LAN router once the Raspberry Pi is connected to it.
You can also set your username and password, configure your WiFi, and set your locale in this tab.
The Raspberry Pi OS, being a special distro of Linux, requires a username and password for almost all of its operations. In fact, you cannot run applications unless the computer knows that the user is an authorized user or a sudo user.
If you own the Raspberry Pi 3 or 4 then your board have WiFi built-in. This means you don’t need an external USB WiFi dongle just to have WiFi capabilities.
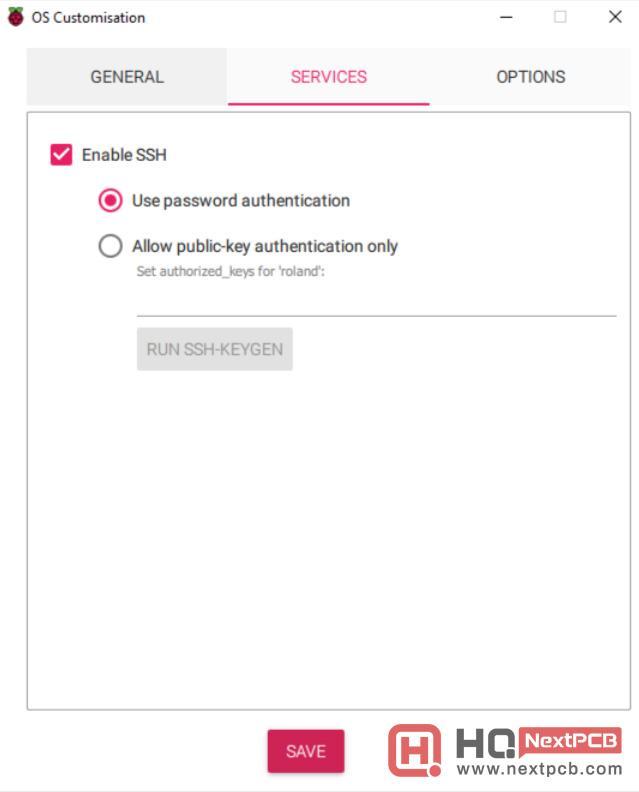
In the “Service” tab, you can enable SSH. SSH or Secure Shell is a way to control and manage the Raspberry Pi remotely using another “host” computer which is on the same network as the RPi.
Select “Use password authentication” if you want to log in using the username and password you set in the previous tab. Select “Allow public-key authentication only” to run a key generator. The output of the key generator will be used to verify your login.
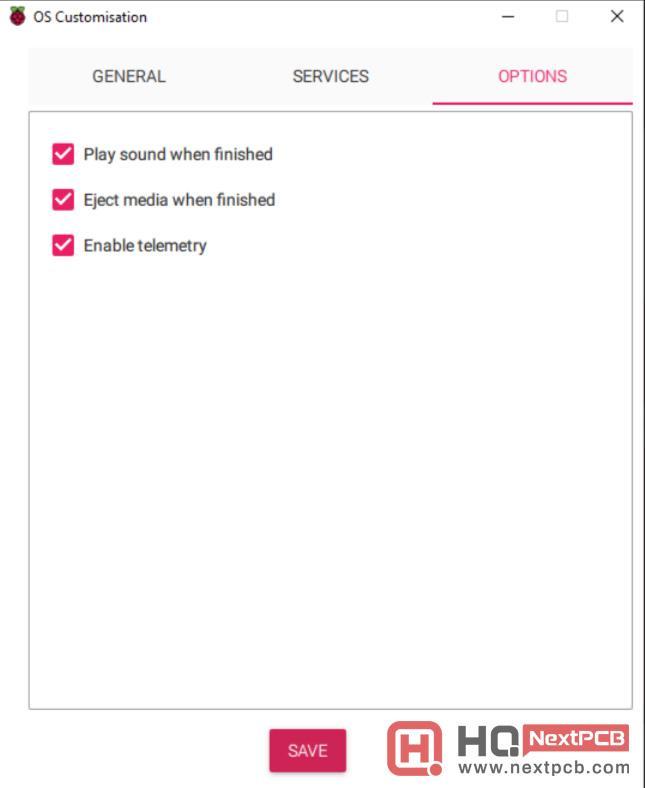
The “Options” tab contains other customizations like playing sound ejecting the SD card when the burning of the image is finished or enabling telemetry (sending your choice of OS to a server for data gathering).
Next, click “Yes” to apply your customizations.
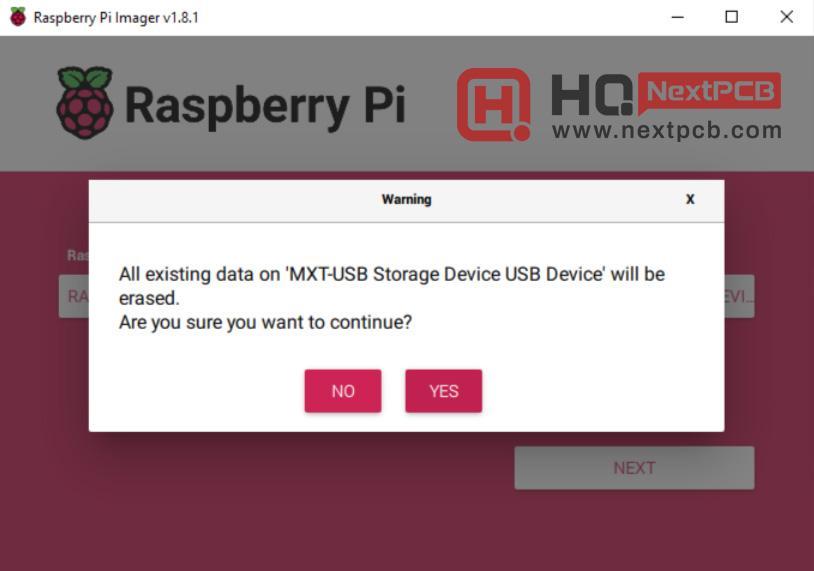
A warning sign saying all the microSD content will be overwritten. Choose “Yes”. I recommend formatting your microSD card before using this application to avoid errors.
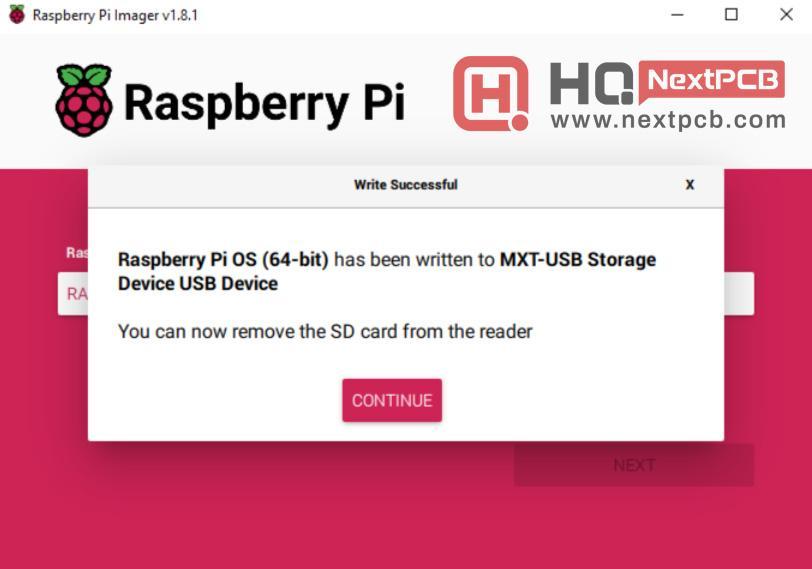
The OS image writing process now started. Wait until it finishes (do not remove the microSD card!)
Congratulations! Your microSD card is now ready to use with the Raspberry Pi.
If however the OS is not loading, the green LED on the board will help you troubleshoot the issue. The OS is loaded correctly if the green LED is always on. If it's continuously blinking, then there is a data reading error. If it blinks three times, then there is a failure in booting the OS. If this happens, you might want to remove the SD card, format it, and write the OS again.
Once you mount your microSD card to your Raspberry Pi and apply power and no issues arise, you’ll have a couple of options on how to use your new computer. You can use it without a GUI through SSH, or with a GUI using VNC. To use VNC, open the terminal and send the command vncserver (32-bit) or vncserver-virtual (64-bit). You’ll need a VNC viewer on your host computer for this and both the host and the Raspberry Pi must be on the same network.
The simplest way, of course, is to just connect a monitor via HDMI and use it like a regular computer.
You can then learn how to code Raspberry Pi and create your own applications using programming languages like Python, QT, C++, and many more! The possibilities are endless!
I hope you learned how to use the Raspberry Pi from scratch from this non-official Raspberry Pi document. Happy building!
- How to turn a Raspberry pi into a Router
- How to install NOOBS on the Raspberry Pi
- Free PCB Assembly Offer is Now Live: Experience Reliable PCB Assembly from HQ NextPCB
- HQ NextPCB Introduces New PCB Gerber Viewer: HQDFM Online Lite Edition
Still, need help? Contact Us: support@nextpcb.com
Need a PCB or PCBA quote? Quote now


 Surface