NextPCB Capabilities
Printed Circuit Boards
NextPCB Capabilities
Printed Circuit Boards
 PCB Assembly
 Layer Buildup
 SMD-Stencils
 PCB Design-Aid & Layout
 Mechanics
 Quality
 Drills & Throughplating
 Factory & Certificate
 PCB Assembly Factory Show
Certificate
PCB Assembly Factory Show
Certificate
Support Team
Feedback:
support@nextpcb.com


Introduction
In the ever-expanding universe of tech gadgets and DIY projects, step into the exciting world of Raspberry Pi, the pocket-sized computer that's captured the imaginations of tech enthusiasts everywhere. In this article, we're starting an exciting journey: turn your raspberry pi as a router, like giving your little computer a superhero makeover! Raspberry Pi is great because it can do so many different things. Today, we'll show you how to turn a raspberry pi as a router, step by step. If you are worried about that, how do I connect my raspberry pi to my router? Don't worry– we'll keep it simple and fun. Let us reveal how to turn on a raspberry pi into a router!
A Raspberry Pi is like a small, affordable computer that can do many different things. It's about the size of a credit card and comes with its own little processor, memory, and even a diy wifi router. People use it as the starting point for all sorts of projects because it's so versatile. One prominent use case is use raspberry pi as router, where the raspberry pi as a router and direct network traffic between devices. It can also function as a robust raspberry pi firewall router, enhancing network security by filtering and controlling data flow. Its ability to connect via Wi-Fi and act as a raspberry pi wifi access point & allows raspberry pi networking to extend raspberry pi network usage to give wireless coverage in homes and offices. When equipped with a raspberry pi modem, the Raspberry Pi becomes a gateway to the internet.
Enthusiasts and tech-savvy individuals often leverage the Raspberry Pi that how to build your own router, with the option to use advanced operating systems like OpenWrt raspberry pi for increased routing capabilities. In summary, the Raspberry Pi is a versatile and cost-effective tool, offering the opportunity to explore and implement a wide range of network and computing projects.
You might wonder why you should consider using a Raspberry Pi as a router when commercial routers are readily available. There are several reasons to opt for a Raspberry Pi:
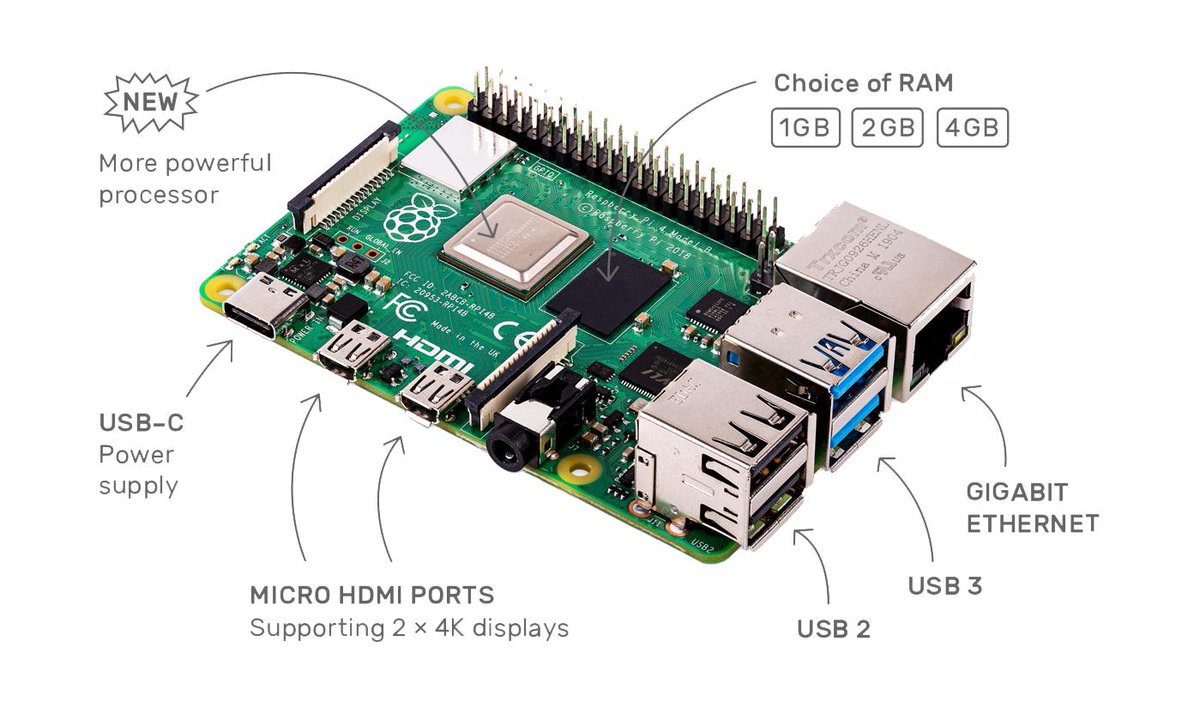
Understanding the hardware specifications of your Raspberry Pi is essential to ensure it meets the requirements for a router. Depending on your model, you'll have variations in CPU power, RAM, and connectivity options. Before proceeding, verify that your Raspberry Pi model aligns with your router needs.
- Broadcom BCM2711, Quad core Cortex-A72 (ARM v8) 64-bit SoC @ 1.5GHz
- 1GB, 2GB or 4GB LPDDR4-2400 SDRAM (depending on model)
- 2.4 GHz and 5.0 GHz IEEE 802.11ac wireless, Bluetooth 5.0, BLE
- Gigabit Ethernet
- 2 USB 3.0 ports; 2 USB 2.0 ports.
- Raspberry Pi standard 40 pin GPIO header (fully backwards compatible with previous boards)
- 2 × micro-HDMI ports (up to 4kp60 supported)
- 2-lane MIPI DSI display port
- 2-lane MIPI CSI camera port
- 4-pole stereo audio and composite video port
- H.265 (4kp60 decode), H264 (1080p60 decode, 1080p30 encode)
- OpenGL ES 3.0 graphics
- Micro-SD card slot for loading operating system and data storage
- 5V DC via USB-C connector (minimum 3A*)
- 5V DC via GPIO header (minimum 3A*)
- Power over Ethernet (PoE) enabled (requires separate PoE HAT)
- Operating temperature: 0 – 50 degrees C ambient
* A good quality 2.5A power supply can be used if downstream USB peripherals consume less than 500mA in total.
To begin setting up your Raspberry Pi as a router, it's crucial to ensure that it's correctly connected to your existing network. This step ensures that your Raspberry Pi can communicate with other devices on your network seamlessly. The following steps will guide you through this process:
Now that you're connected to your Raspberry Pi, you can begin the process of configuring it as a router.
Now comes the exciting part – turn pi into a router. We'll break down this process into manageable steps:
1. Installing and Updating Raspberry PI OS: Begin by installing Raspberry PI OS, the Raspberry Pi's official operating system. We'll also ensure it's up-to-date.
To install Raspberry PI OS, follow these steps:
2. Install dnsmasq and hostapd: These are essential software components for routing and creating a Wi-Fi hotspot with your Raspberry Pi. To install them, open a terminal window and run the following commands:
sudo apt-get update
sudo apt-get install dnsmasq hostapd
3. Configuring a Static IP Address: Learn how to set a static IP address for your Raspberry Pi's Wi-Fi interface (WLAN0) or platform. This step ensures that your Raspberry Pi always has the same IP address on your network.
To configure a static IP address, edit the dhcpcd configuration file:
sudo nano /etc/dhcpcd.conf
Then, add the following lines at the end of the file, replacing
interface wlan0
static ip_address=
static routers=
static domain_name_servers=
Save the file and exit the text editor.
4. DHCP Server Configuration: Configure the DHCP server to assign IP addresses to connected devices automatically. Open the dnsmasq configuration file for editing:
sudo nano /etc/dnsmasq.conf
Add the following lines to the file to configure DHCP:
interface=wlan0
dhcp-range=
Replace
Save the file and exit the text editor.
Set up hostapd to create a Wi-Fi access point for your devices.
Create and edit the hostapd configuration file:
sudo nano /etc/hostapd/hostapd.conf
Add the following lines to the file:
interface=wlan0
ssid=
hw_mode=g
channel=7
wmm_enabled=0
macaddr_acl=0
auth_algs=1
ignore_broadcast_ssid=0
wpa=2
wpa_passphrase=
wpa_key_mgmt=WPA-PSK
wpa_pairwise=TKIP
rsn_pairwise=CCMP
Replace
Save the file and exit the text editor.
1. Set Traffic Forward: Configure the Raspberry Pi to forward network traffic between your LAN and the internet.
Open the sysctl configuration file:
sudo nano /etc/sysctl.conf
Uncomment the following line to enable IP forwarding:
net.ipv4.ip_forward=1
Save the file and exit the text editor.
2. Add a New iptables Rule: Enhance your router's security by adding iptables rules to forward traffic:
sudo iptables -t nat -A POSTROUTING -o eth0 -j MASQUERADE
This rule allows the Raspberry Pi to masquerade (modify) the source IP address of outgoing packets, making it appear as if they originate from the Raspberry Pi itself.
3. Enable Internet Connection: Ensure your Raspberry Pi router can access the internet. Test your connection by running:
ping www.google.com
If you receive responses, your Raspberry Pi can access the internet.
4. Reboot: A simple reboot finalizes the setup. Restart your Raspberry Pi:
sudo reboot
To take your Raspberry Pi router to the next level, consider using it as a VPN router. This adds an extra layer of privacy and security to your network.
1. Install OpenVPN: Learn how to set up OpenVPN on your Raspberry Pi. OpenVPN is a popular open-source VPN server that provides robust security and encryption.
To install OpenVPN, run the following command:
sudo apt-get install openvpn
2. VyprVPN Download and Unzipping: Download and unzip VyprVPN, a VPN client.
3. VPN List: Configure your VPN connection by adding it to your list. VyprVPN is an excellent choice for securing your network. You can sign up for a VyprVPN account and follow their instructions to download the necessary configuration files.
Generate an authorization file for your VPN. This file will contain your VyprVPN username and password, allowing your Raspberry Pi to connect automatically.
To create the authorization file, open a text editor and enter your VyprVPN credentials in the following format:
username
password
Save the file as vyprvpn-auth.txt in a secure location on your Raspberry Pi.
1. Test Run: Test your VPN connection to ensure it's working seamlessly. To connect to VyprVPN, run the following command:
sudo openvpn --config /path/to/your/config.ovpn --auth-user-pass /path/to/your/vyprvpn-auth.txt
Replace /path/to/your/config.ovpn with the path to your VyprVPN configuration file and /path/to/your/vyprvpn-auth.txt with the path to your authorization file.
Check your connection status by running:
curl ipinfo.io
If everything is set up correctly, you should see information about the VyprVPN server location.
2. Iptables Fun: Enhance your security by configuring iptables for the VPN. Iptables is a powerful firewall tool that allows you to control network traffic on your Raspberry Pi.
To configure iptables, create a shell script (e.g., iptables-config.sh) and add the following rules:
#!/bin/bash
# Flush existing rules and set default policies to DROP
iptables -F
iptables -P INPUT DROP
iptables -P FORWARD DROP
iptables -P OUTPUT ACCEPT
# Allow loopback traffic
iptables -A INPUT -i lo -j ACCEPT
iptables -A OUTPUT -o lo -j ACCEPT
# Allow established and related connections
iptables -A INPUT -m state --state ESTABLISHED,RELATED -j ACCEPT
# Allow VPN traffic
iptables -A INPUT -i tun0 -j ACCEPT
# Allow SSH access (change the port if you use a custom one)
iptables -A INPUT -p tcp --dport 22 -j ACCEPT
# Allow DNS queries (UDP)
iptables -A INPUT -p udp --sport 53 -j ACCEPT
iptables -A INPUT -p udp --dport 53 -j ACCEPT
# Allow HTTP and HTTPS traffic
iptables -A INPUT -p tcp --dport 80 -j ACCEPT
iptables -A INPUT -p tcp --dport 443 -j ACCEPT
# Log dropped packets (optional)
iptables -A INPUT -j LOG --log-prefix "Dropped: "
# Save the rules
iptables-save > /etc/iptables/rules.v4
Make the script executable:
sudo chmod +x iptables-config.sh
Then, run the script to apply the iptables rules:
sudo ./iptables-config.sh
3. Automate Things: Make your Raspberry Pi VPN router more convenient with automation. You can create a systemd service to start the VPN and firewall rules at boot. Create a systemd service file (e.g., vpn-router.service) with the following content:
[Unit]
Description=Raspberry Pi VPN Router Service
After=network.target
[Service]
ExecStart=/usr/bin/sudo /usr/sbin/openvpn --config /path/to/your/config.ovpn --auth-user-pass /path/to/your/vyprvpn-auth.txt
ExecStartPost=/usr/bin/sudo /path/to/your/iptables-config.sh
[Install]
WantedBy=multi-user.target
Replace /path/to/your/config.ovpn and /path/to/your/vyprvpn-auth.txt with the appropriate paths.
Copy the service file to /etc/systemd/system/:
sudo cp vpn-router.service /etc/systemd/system/
Enable and start the service:
sudo systemctl enable vpn-router.service
sudo systemctl start vpn-router.service
Now, your Raspberry Pi VPN router will automatically connect to VyprVPN and apply the firewall rules on boot.
If you're concerned about the performance of your Raspberry Pi 3 VPN router, it's essential to set realistic expectations. The Raspberry Pi 3, while capable, does have limitations in terms of VPN throughput.
The VPN speed you can achieve with a Raspberry Pi 3 depends on various factors:
- Internet Connection Speed: The speed of your internet connection is a crucial factor. The Raspberry Pi 3's VPN performance may be limited by the speed of your internet plan.
- VPN Provider: The VPN provider you choose can impact performance. Some providers offer faster servers and better encryption options.
- Encryption Settings: The level of encryption used in your VPN configuration can affect speed. Higher encryption levels provide better security but may reduce speed.
In typical scenarios, a Raspberry Pi 3 can achieve VPN speeds ranging from 20 to 30 Mbps. While this may be sufficient for many tasks, such as web browsing and streaming, it may not be suitable for high-bandwidth activities like 4K video streaming or large file downloads.
If you require higher VPN speeds, you may consider upgrading to a more powerful Raspberry Pi model, such as the Raspberry Pi 4 router, which offers improved CPU performance and faster network interfaces.
In conclusion, turning a Raspberry Pi into a router and VPN gateway is a rewarding project that can significantly enhance your network's security and privacy. By following the steps outlined in this guide, you've created a custom router that allows you to have full control over your network, from routing traffic to securing your connections with a VPN.
With your Raspberry Pi router in place, you've unlocked the potential to explore advanced networking concepts, experiment with firewall configurations, and learn more about Linux-based networking. It's not just a practical solution; it's also a valuable educational experience.
So, why settle for an off-the-shelf router when you can build your own with a Raspberry Pi? Start your journey today, and experience the benefits of a customized and secure network solution.
- The Ultimate Guide to Arduino Nano Pinout
- Free PCB Assembly Offer is Now Live
- HQ NextPCB Introduces New PCB Gerber Viewer: HQDFM Online Edition
Still, need help? Contact Us: support@nextpcb.com
Need a PCB or PCBA quote? Quote now


 Surface