
 Surface


Sylvia Zhang

 NextPCB Capabilities
Printed Circuit Boards
NextPCB Capabilities
Printed Circuit Boards
 PCB Assembly
 Layer Buildup
 SMD-Stencils
 PCB Design-Aid & Layout
 Mechanics
 Quality
 Drills & Throughplating
 Factory & Certificate
 PCB Assembly Factory Show
Certificate
PCB Assembly Factory Show
Certificate
Support Team
Feedback:
support@nextpcb.com


Arduino, a popular open-source platform, has taken the world of electronics and DIY projects by storm. The key to harnessing its full potential lies in understanding the pinout - the arrangement of pins that serve as the interface between the Arduino board and various components. In this beginner-friendly guide, we'll explore the basics of Arduino Nano pinout, shedding light on how to effectively connect and interact with a wide range of devices to bring your creative projects to life.

The Arduino Nano is a popular alternative to the Arduino UNO, sharing many features with its larger counterpart. Both are based on the ATmega328P microcontroller, but Nano's smaller size sets it apart.
The Nano lacks a DC power jack and features a mini-B USB connector instead of UNO's standard one. However, it retains similar functionality. Its breadboard-friendly design makes it easy to use in DIY projects.
Thus, Arduino Nano is an excellent, cost-effective option compared to the UNO. It's smaller, more affordable, and offers additional pins for digital and analog IO while remaining breadboard friendly.
Arduino Nano is small but mighty. This compact microcontroller board packs all the required features. Here, we'll explore its top features.
| Feature | Specification |
| Microcontroller | ATmega328P |
| Operating Voltage | 5V |
| Input Voltage Range | 7V - 12V |
| Digital I/O Pins | 14 (6 with PWM) |
| Analog Input Pins | 6 (ADC channels) |
| DC Current per I/O Pin | 40 mA |
| Flash Memory | 32 KB |
| SRAM | 2 KB |
| EEPROM | 1 KB |
| Clock Speed | 16 MHz |
| UART | 1 |
| SPI | 1 |
| I2C | 1 |
| USB Interface | Built-in |
| Dimensions | 18 mm x 45 mm |
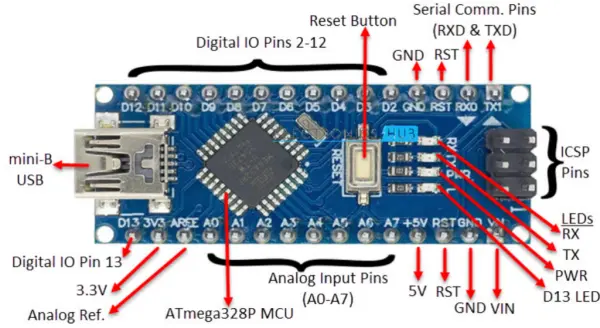
The Arduino Nano boasts 30 pins, 22 of which cater to input and output functions. Among these, 14 digital IO pins (D0-D13) can be customized using pinMode(), digitalWrite(), and digitalRead() functions. Capable of sourcing or sinking 40mA of current, these pins also feature internal pull-up resistors, ranging from 20KΩ to 50KΩ.
In addition to digital pins, the Nano sports 8 analog input pins (A0-A7). These provide a 10-bit resolution ADC, which can be read using the analogRead() function. Notably, the Nano offers more analog pins than the Arduino UNO, which has only 6. If needed, all analog pins, except A6 and A7, can be configured as digital IO pins.
For PWM signals, digital IO pins 3, 5, 6, 9, 10, and 11 are capable of producing 8-bit output. To utilize this feature, simply use the analogWrite() function.
Here's a tabular representation of the Arduino Nano pins, with a more readable description of their functions and alternative roles:
| Pin Number | Pin Name | Description |
| 1 | TX / D1 | Digital IO Pin 1 |
| 2 | RX / D0 | Digital IO Pin 0 |
| 3 | RST | Reset (Active LOW) |
| 4 | GND | Ground |
| 5 | D2 | Digital IO Pin 2 |
| 6 | D3 | Digital IO Pin 3 |
| 7 | D4 | Digital IO Pin 4 |
| 8 | D5 | Digital IO Pin 5 |
| 9 | D6 | Digital IO Pin 6 |
| 10 | D7 | Digital IO Pin 7 |
| 11 | D8 | Digital IO Pin 8 |
| 12 | D9 | Digital IO Pin 9 |
| 13 | D10 | Digital IO Pin 10 |
| 14 | D11 | Digital IO Pin 11 |
| 15 | D12 | Digital IO Pin 12 |
| 16 | D13 | Digital IO Pin 13 |
| 17 | 3V3 | Power |
| 18 | AREF | Analog Reference |
| 19 | A0 | Analog Input 0 |
| 20 | A1 | Analog Input 1 |
| 21 | A2 | Analog Input 2 |
| 22 | A3 | Analog Input 3 |
| 23 | A4 | Analog Input 4 |
| 24 | A5 | Analog Input 5 |
| 25 | A6 | Analog Input 6 |
| 26 | A7 | Analog Input 7 |
| 27 | 5V | +5V Output/Input |
| 28 | RST | Reset (Active LOW) |
| 29 | GND | Ground |
| 30 | VIN | Unregulated Supply |
The following table describes the pins of the ICSP Connector:
| Pin Name | Description | Pin Name |
| MISO | Master In Slave Out | MISO |
| 5V | Supply | 5V |
| SCK | Clock (Master to Slave) | SCK |
| MOSI | Master Out Slave In | MOSI |
| RESET | Active Low | Reset Pin |
| GND | Ground | GND |
Mini USB: Smaller than standard USB and larger than micro USB, the Mini USB powers the Nano board. It also enables connection to a computer for programming purposes.
Vin: This modulated DC supply voltage regulates the ICs in the circuit. Often referred to as the primary voltage for ICs on the Arduino board, Vcc voltage values can be either negative or positive relative to the GND pin.

The Arduino Nano boasts three distinct communication interfaces: Serial, I2C, and SPI. Serial communication, often regarded as the most prevalent interface in the Arduino ecosystem, is crucial for programming Arduino boards like the UNO, Nano, and Mega.
Digital IO pins 0 and 1 function as Serial RX and TX pins, facilitating the reception and transmission of serial data. These pins connect to the on-board USB-to-Serial Converter IC's serial pins.
Additionally, analog input pins A4 and A5 possess alternative roles. They can be configured as SDA (A4) and SCK (A5) to enable I2C communication or support the Two Wire Interface (TWI).
Finally, SPI communication is available through digital IO pins 10, 11, 12, and 13. These pins can be configured as SPI pins SS, MOSI, MISO, and SCK, respectively.
The Arduino Nano is a compact, versatile microcontroller beloved by makers and hobbyists alike. However, working with this tiny powerhouse can sometimes present challenges. Common issues related to pins and connections can disrupt your projects and leave you scratching your head.
Misbehaving pins, loose connections, or incorrect wiring can all contribute to these problems. Dust, dirt, or physical damage to the pins may also impede their performance. In this section, we will delve into the common issues that arise with Arduino Nano pins and connections. By understanding these potential pitfalls, you will be better equipped to troubleshoot and resolve them.
Before you can resolve pinout issues with your Arduino Nano, it's crucial to first identify the root of the problem. Armed with a multimeter and a keen eye, you can check for continuity, voltage, and possible visual signs of poor connections or damaged pins. Once you've identified the issue, it's time to take action.
Re-soldering connections, replacing faulty pins, or re-wiring your project can all help get your Arduino Nano back on track. This section will discuss strategies for identifying and resolving pinout issues, giving you the tools to conquer these challenges and keep your Arduino projects running smoothly.
Maintaining optimal performance is the ultimate goal for any Arduino enthusiast. To achieve this, it's essential to follow best practices and take care of your Arduino Nano. Proper soldering techniques, using quality components, and avoiding excessive force on pins can all contribute to the longevity and performance of your microcontroller.
Ensuring neat, secure connections and handling your Arduino Nano with care will help prevent issues before they arise. In this section, we will explore tips and tricks for keeping your Arduino Nano operating at peak performance. By adhering to these guidelines, you'll enjoy a smoother experience with your Arduino projects, allowing your creativity to flourish without interruption.
In summary, this article has provided a concise overview of the Arduino Nano board layout, key specifications, notable features, and comprehensive pinout information.

Sylvia Zhang
Sylvia joined NextPCB two years ago and has already become the go-to partner for clients who need more than just boards. By orchestrating supply-chain resources and refining every step from prototype to mass production, she has repeatedly delivered measurable cost savings and zero-defect launches. Consistency is her hallmark: every client, every order, receives the same uncompromising quality and responsive service.
The Arduino Nano's logic level is 5V. If you connect 3.3V-rated sensors directly to the data pins, you risk damaging the sensor. You should always use a logic level converter (bi-directional logic level shifter) to safely interface the Nano with 3.3V components.
The VIN pin is an input meant for an unregulated power supply (typically between 7V and 12V), which the onboard regulator steps down to power the board. The 5V pin outputs a regulated 5V (from the USB or the onboard regulator) that you can use to power your external components.
If you are using a generic Nano clone, it likely utilizes the CH340 USB-to-serial chip instead of the official FTDI chip. You will need to manually download and install the CH340 drivers for your operating system. Additionally, ensure you are using a data-sync mini-USB cable, as "power-only" cables will not allow your PC to recognize the board.
Each individual digital and analog I/O pin is rated for a maximum of 40mA. However, to maintain board health and prevent overheating, it is highly recommended to design your circuits so that they draw no more than 20mA per pin continuously.
Yes, analog pins A0 through A5 can be set as digital pins using the standard pinMode(), digitalRead(), and digitalWrite() functions. Keep in mind that pins A6 and A7 are exceptions to this rule and can only function as analog inputs.
Still, need help? Contact Us: support@nextpcb.com
Need a PCB or PCBA quote? Quote now

