NextPCB Capabilities
Printed Circuit Boards
NextPCB Capabilities
Printed Circuit Boards
 PCB Assembly
 Layer Buildup
 SMD-Stencils
 PCB Design-Aid & Layout
 Mechanics
 Quality
 Drills & Throughplating
 Factory & Certificate
 PCB Assembly Factory Show
Certificate
PCB Assembly Factory Show
Certificate
Support Team
Feedback:
support@nextpcb.com


Introduction
Secure Shell (SSH) is a way to connect and send commands to a remote computer, particularly a computer running on the Linux operating system. Because the Raspberry Pi is commonly used with a Linux-based operating system (OS), it’s possible to connect and control it via SSH.
SSH was invented in 1995 as a more secure protocol to communicate remotely versus its predecessor, Telnet. Believe it or not, before SSH, remote login sessions were transmitting data, including login credentials, in plain text, making them susceptible to interception and eavesdropping. With SSH, the data is now encrypted so anyone who tries to hack into the sessions will not be able to easily read what is being sent or received.
Over the years, SSH has undergone continuous development and improvement. New features, algorithms, and security enhancements have been introduced to keep up with evolving security standards and address emerging threats.
Today, SSH is a fundamental tool for secure communication and remote administration. It is widely used in various applications, not only in remote login, but also in file transfer (using SFTP and SCP), and secure tunneling for other protocols.
SSH follows a client-server architecture where the Raspberry Pi is the client and the host computer is the server. This article will show you how to SSH into a Raspberry Pi via Windows host or other operating systems.
But first, why do you need SSH in a Raspberry Pi? Well, sometimes it is convenient to just use your own computer to control the RPi rather than connect a monitor, mouse, and keyboard to it. SSH also makes it possible to run a Virtual Network Computing (VNC) application, allowing you to use a graphical user interface with the Raspberry Pi.
Once a host computer is connected to the Raspberry Pi via SSH, the user may now be able to control the Raspberry Pi and even run applications on it. For example, you can open a text editor such as Vim or Nano and write code to it. Then you can compile and run the code without any restrictions assuming the credentials you used to log in are an administrator account.
You can also read from or write to the GPIO pins of the Raspberry Pi via SSH. This is easier to do in Python than other programming languages. You can also use SSH to check the status of the Raspberry Pi while running a perpetually running application or daemon.
SSH is not enabled by default on the Raspberry Pi due to security reasons. There are several ways to enable it, depending on what operating system you are using as a host. There is also a way to enable it regardless of the host OS. Here’s how to do it.
If for some reason writing a file into the microSD card is not possible for you, then read the following section.
If you’re Raspberry Pi already contains an OS and you want to enable it, here’s what you should do.
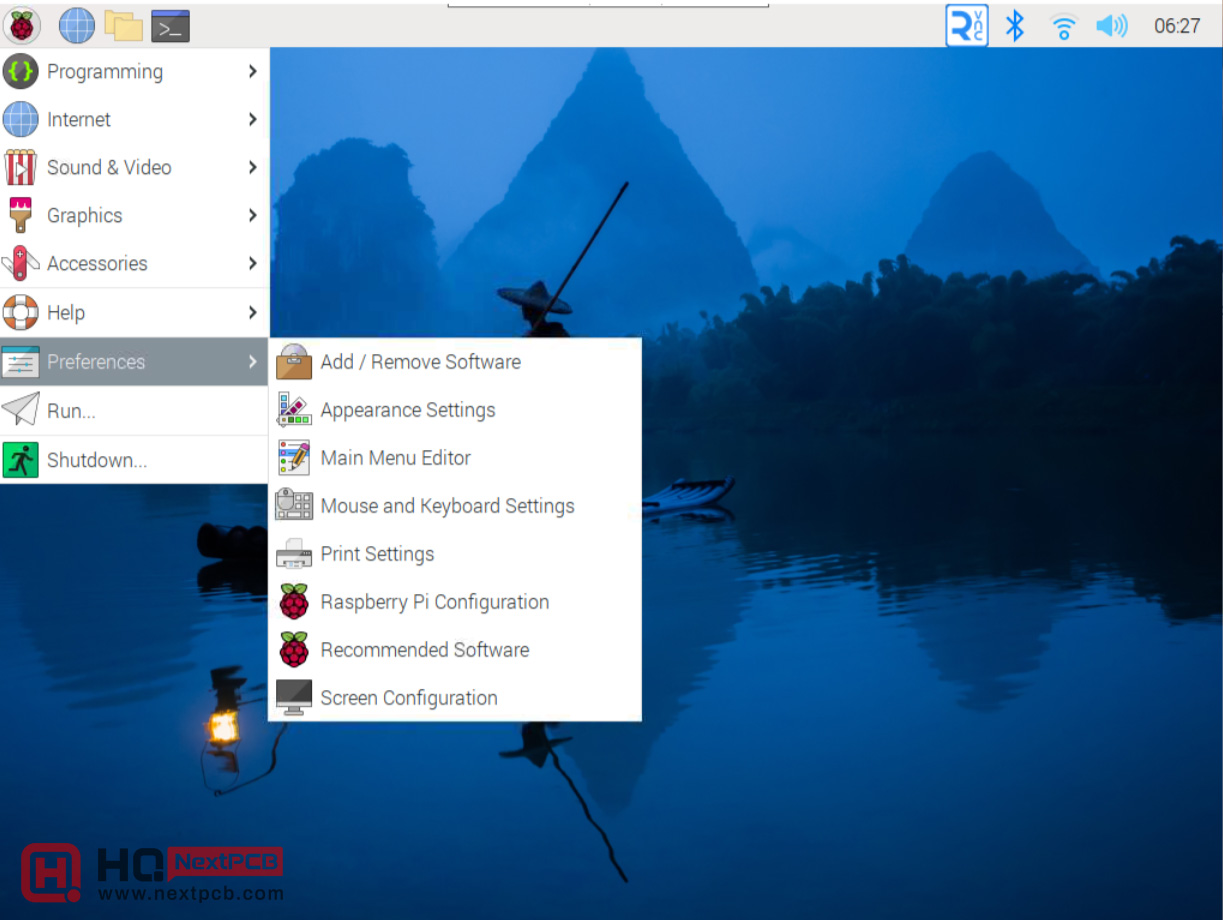
Connect a monitor, mouse, and keyboard to your Raspberry Pi. Power it up and wait for the desktop to appear. On the desktop, go to Preferences > Raspberry Pi Configuration.
The Raspberry Pi Configuration window should appear. This window contains several settings that you can enable or disable. For now, we’ll only use SSH, which is under the Interfaces tab. Toggle the SSH option to on.
After this, you can now SSH into the Raspberry Pi using your choice of application on your host computer.
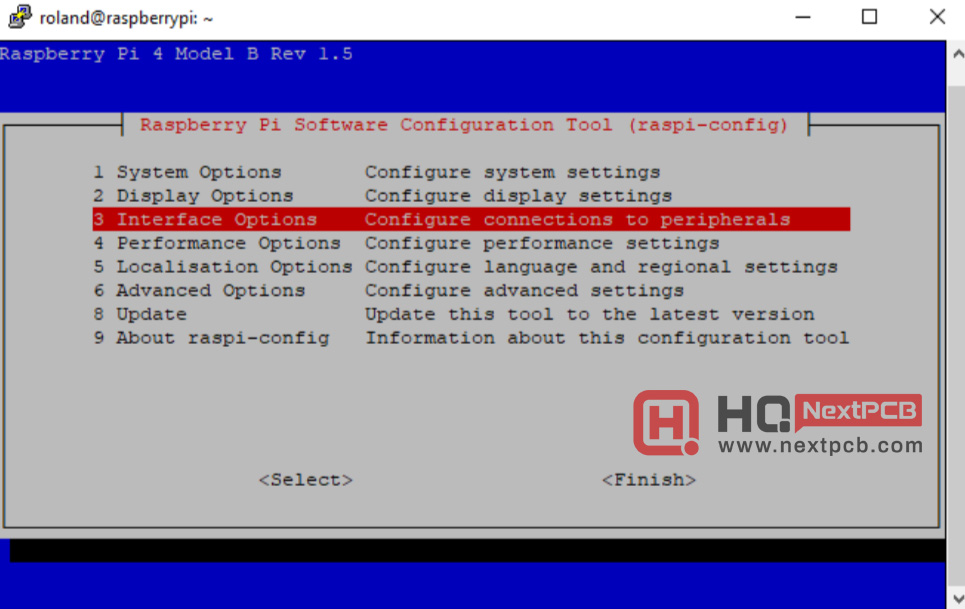
Similar to the previous step, connect a monitor, mouse, and keyboard to your Raspberry Pi. Wait for it to boot and show the desktop. Then, click on the third icon from the Raspberry Pi on the top-left. This opens the terminal application. On the terminal, type sudo raspi-config. We use sudo here because opening Raspberry Pi Configuration requires administrator access. After running this, the command line version of the Raspberry Pi Configuration appears.
Select Interface Options:
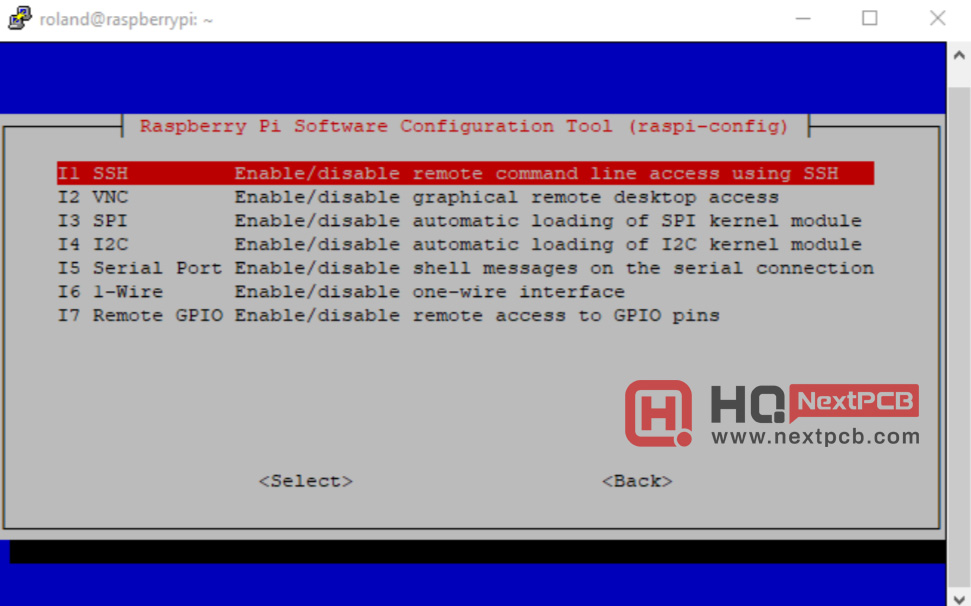
Again you’ll see the different interface options that you can either enable or disable. For now, we will only enable SSH. Highlight SSH and press enter.
Choose Yes when this screen appears:
Once enabled, you can now access the Raspberry Pi remotely via SSH using your choice of application on your host computer.
You’ll notice the warning sign here. It is important to use secure passwords for your login credentials as SSH is vulnerable to “brute force” attacks. This method employs all words in the dictionary to try and guess what your password is. Therefore, don’t use passwords that are found in dictionaries! Another way to combat brute force attacks is to limit login attempts on SSH.
You’ll need the Raspberry Pi’s Local Area Network (LAN) IP address to SSH into it. Most likely, the hostname raspberrypi.local will be retained so you can try this. Or, if you are able to access the terminal, type in hostname -I.
Alternatively, you can also determine the IP address of the Raspberry Pi using the command ifconfig.
The RPi’s IP address should be shown right next to the interface it is using:
Here, the Raspberry Pi is using WiFi. You can see its IP address as 192.168.1.17.
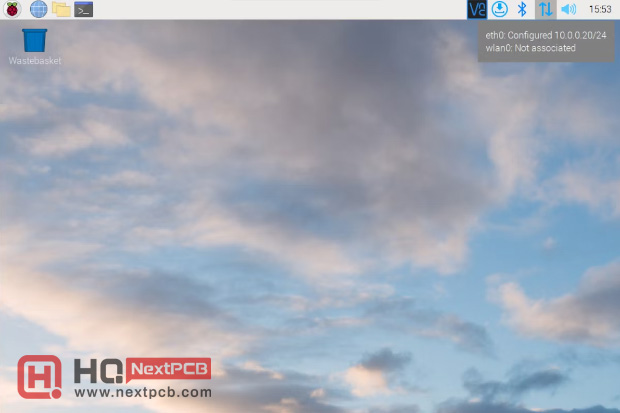
If you can access your RPi via the desktop GUI, you can view its IP address by hovering over the WiFi icon in the upper right corner:
Note that you can only SSH into the RPi using this IP address if your host computer and the RPi are on the same network. If you want to SSH into the RPi from a host computer outside your network, then you need to set up port forwarding.
With port forwarding, the Raspberry Pi will be assigned a public address by the router. This IP address will be accessible via the Internet as long as your network’s firewall allows it. With this, you can remotely send commands to your Raspberry Pi wherever you are!
What if you forgot the IP address of your Raspberry Pi and it’s not the default hostname? The solution is to use an application called Nmap.
Nmap or Network Mapper is a network scanning application. With it, you can determine the IP address of every device that is connected to the same network as your host computer.
Nmap doesn’t have a GUI and is run through the command line or terminal. First, determine your local network’s subnet. For example, if your host computer’s IP address is 192.168.1.x then your subnet is 192.168.1.0. All devices connected to your LAN will have the same subnet. To scan open command line or terminal and use the command
nmap -sP 192.168.1.0/24
After a few seconds, the following results will be displayed:
Starting Nmap 7.94 ( https://nmap.org ) at 2023-11-27 19:31 Malay Peninsula Standard Time
Nmap scan report for 192.168.1.1
Host is up (0.0040s latency).
MAC Address: 5C:3A:3D:ED:94:98 (zte)
Nmap scan report for 192.168.1.2
Host is up (0.14s latency).
MAC Address: 10:5A:17:2B:11:A2 (Tuya Smart)
Nmap scan report for samsung (192.168.1.4)
Host is up (0.23s latency).
MAC Address: 54:3A:D6:6D:70:F1 (Samsung Electronics)
Nmap scan report for wlan0 (192.168.1.6)
Host is up (0.25s latency).
MAC Address: 2E:87:BA:D5:D9:D5 (Unknown)
Nmap scan report for 192.168.1.7
Host is up (0.0070s latency).
MAC Address: 2E:87:BA:D5:D9:D5 (Unknown)
Nmap scan report for 192.168.1.8
Host is up (0.0060s latency).
MAC Address: AC:CC:FC:1C:28:DD (Amazon Technologies)
Nmap scan report for raspberrypi (192.168.1.9)
Host is up (0.33s latency).
MAC Address: CC:E1:D5:4C:3B:96 (BUFFALO.INC)
Nmap scan report for re215 (192.168.1.11)
Host is up (0.0060s latency).
MAC Address: 2E:87:BA:D5:D9:D5 (Unknown)
Nmap scan report for 192.168.1.16
Host is up (0.43s latency).
MAC Address: E4:5F:01:A4:60:AD (Raspberry Pi Trading)
Nmap scan report for 192.168.1.15
Host is up.
Nmap done: 256 IP addresses (10 hosts up) scanned in 16.95 seconds
Here you can see that the Raspberry Pi has the IP address 192.168.1.16 (the one with MAC Address E4:5F:01:A4:60:AD and named “Raspberry Pi Trading”).
Use Putty to SSH into Raspberry Pi from Windows. Download Putty and run.
On the hostname field, type in the IP address of the Raspberry Pi or raspberrypi.local by default:
The Port field should be 22, and the connection type is SSH. Click Open.
You will be asked here for your login credentials. If you were not able to setup your credentials upon saving the OS on the SD card using Raspberry Pi Imager, use the default: username: pi / password: raspberry
If you see this screen, this means you are now connecting remotely to the Raspberry Pi using SSH. You can now issue commands to control or manage your Raspberry Pi.
You don’t need any additional software to SSH into the Raspberry Pi with a macOS computer. Open Terminal on a computer on the same network as your Raspberry Pi and running macOS and type the command SSH
ssh roland@192.168.1.17
You will then be asked for your password, similar to SSH using Putty in Windows. Note that you can also use raspberrypi.local instead of the IP address assuming this has not been changed.
Like the macOS, the SSH tool is built-in inside any Linux operating system. The same command can be used to SSH into the Raspberry Pi if you already know its IP address. Open Terminal on a computer running Linux and type the command SSH
ssh roland@192.168.1.17.
To SSH into Raspberry Pi from an Android device, you need an application called Termius which is free to download from the app store. Just like the other options above, all you need is to provide the hostname (IP address), username, and password. Agan, the mobile phone and the Raspberry Pi must be on the same network.
SSH is a very useful tool to remotely connect to the Raspberry Pi. In fact, you can write programs for the RPi via SSH only! Since you now have access to the RPI’s terminal, you also have access to all the commands including compiler programs.
Truly, using the RPi via SSH is one cool way to control it. But while SSH is a widely used and secure protocol for accessing and managing the Raspberry Pi, there are some potential disadvantages or challenges associated with its use, particularly in security.
To avoid security vulnerabilities with SSH on the Raspberry Pi, consider using key-based authentication rather than password authentication, use an app called Fail2Ban to prevent brute force attacks, and enable logging for monitoring all SSH login attempts.
I hope you learned how to remote SSH into the Raspberry Pi from this article. Happy building!
- How to turn a Raspberry pi into a Router
- How to install NOOBS on the Raspberry Pi
- Free PCB Assembly Offer is Now Live: Experience Reliable PCB Assembly from HQ NextPCB
- HQ NextPCB Introduces New PCB Gerber Viewer: HQDFM Online Lite Edition
Still, need help? Contact Us: support@nextpcb.com
Need a PCB or PCBA quote? Quote now


 Surface