
 NextPCB Capabilities
Printed Circuit Boards
NextPCB Capabilities
Printed Circuit Boards
 PCB Assembly
 Layer Buildup
 SMD-Stencils
 PCB Design-Aid & Layout
 Mechanics
 Quality
 Drills & Throughplating
 Factory & Certificate
 PCB Assembly Factory Show
Certificate
PCB Assembly Factory Show
Certificate
Support Team
Feedback:
support@nextpcb.com


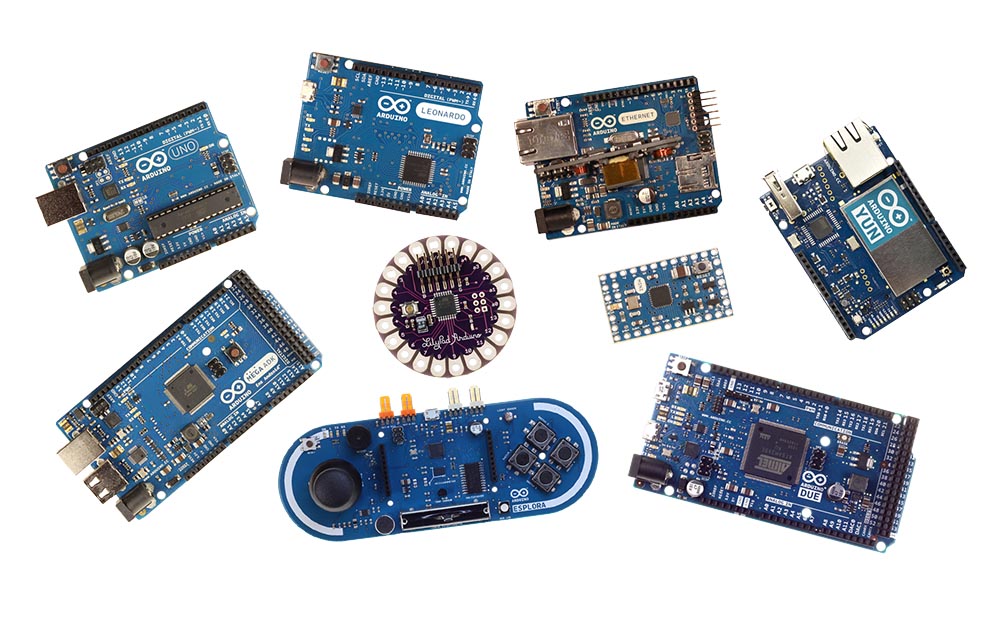
Arduino boards have become the most popular microcontroller in the present day. The popularity of the board has increased due to the increase in automation in today's market. It is best for beginners who want to build their projects because of its ease and unparalleled options. Arduino has launched some common boards to get the job done easily.
This article will cover the three most common Arduino boards; Arduino Uno, Arduino Mega, and Arduino Micro. Also, the reader can have all their technical specializations, major differences, and tips for choosing the right Arduino board for their project.
Arduino is an open-source hardware development board used for developing projects and interacting with the real world. In addition to this, it helps the developer to solve a real-world problem. The use of Arduino has access to the world of microcontrollers. The controller used in Arduino is based on the ATmega AVR microcontroller. It uses a development part called Arduino IDE. It uses the C ++ programming language to automate the work. Arduino has uncovered vast learning opportunities due to its advantages and easy-to-use features. While on the other hand, it also has some drawbacks of Arduino that you need to consider while selecting the best board for your project.
Arduino is super easy to use and learn. It uses simple C and C++ programming languages and is ideal for beginners. Arduino is simple and board with a minimal hardware interface and is easy to use for all users.
Arduino's best feature is that it is available not only in Windows but also in Linux and macOS. In contrast, some of the microcontrollers are only supported by Windows.
If you check the price of Arduino boards, you will be shocked by their price. The board is available at a low cost and is easily affordable by normal users. Besides, it requires an IDE to operate, and the good news is; the IDE is completely an open-source platform. Arduino board can handle all the needs to communicate with the external devices and thus helps to cut the overall cost of the project.
If you want to control various external modules, motors, and sensors, then Arduino provides you with a town of libraries. These libraries increase the board's functionality; thus, you can easily integrate Arduino with external devices.
Besides, Arduino is an open-source platform with an open-source community with various online supports available on Arduino forums. Because of this open-source platform, you can find various projects, from controlling devices to smart home systems on the internet.
Arduino only runs a single program simultaneously, unlike Rasberry pi, which offers multitasking features. You must shut down one program to execute the other in the Arduino board.
Arduino has limited storage capacity. The common board, Arduino Uno, has a memory of 2kb SRAM and a flash memory of 32 kB. With this amount of memory size, only hundreds of lines of code can be used. Because of the limited storage size of Arduino, it is limited to education platforms and not to industry-scale works.
Arduino is limited to Wi-Fi and Bluetooth platforms. It needs external hardware to enable these features. While some boards have the built-in features of these wireless communication interfaces, it increases the project's overall cost.
Arduino boards are mostly programmed in C and C++. It lacks the support for Python, Java, and JS, because of which it is limited to small areas only.
The microcontroller used in Arduino boards is limited in its working performance. Arduino development is optimized for beginners for their ease. If the same microcontroller is used with AVR, the performance could have been increased.
Arduino Uno is the open-source microcontroller board that is the family of the Microchip ATmega 328P microcontroller. It is one of the best boards to get started with electronic and coding applications for the project. Arduino Uno is the first board that Arduino released. cc. The major benefit of this board is it is easy to use compared to other boards. The board is the proper combination of digital and analog pins with 6 analog pins and 14 digital pins configurations, along with the USB port for serial communication, a power jack, an ICSP headers. The 6 pins among the 14 digital pins can be used as PWM outputs. Besides, it also has a 16MHz crystal oscillator that usually provides the clock signal and synchronizes the communication in the board.
A USB cable or an external 9V battery supply can power the board. Arduino is programmed based on IDE, an integrated development environment, and can run on both online and offline platforms. The ATmega328 allows the uploading of new code without external hardware since it comes with a pre-programmed bootloader.
Arduino Uno is one of the most popular Arduino. It usually comes with two types; SMD version and through-hole, i.e., it either uses surface mount or through-hole ATmgea 328.
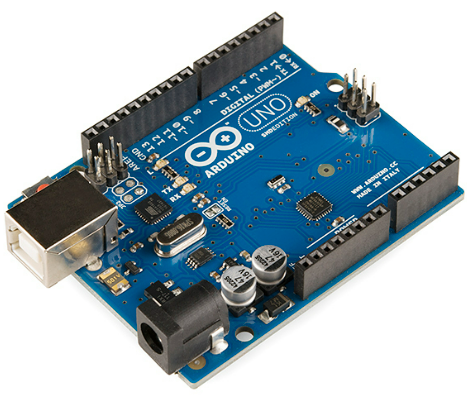
Arduino Uno board takes power either from a USB cable or the external power supply. External power sources can be either from the battery or the AC-DC adapter.
Plugging the adapter into the board's power jack requires using a 2.1mm center-positive plug. Batteries can be connected to the POWER connector by putting leads into the GND and VIN pin headers. The board can operate from 6 to 20 volts depending on the external supply. The board may become unstable if supplied with less than 7V. On the other hand, overheating and damage to the board may result if more than 12V is used. Thus, the best voltage range for this board is between 7-12V.
The power pins configuration of Arduino Uno is as follows:
Arduino Uno can communicate with computer devices or any other microcontroller devices. It has the UART TTL of 5V, a serial communication protocol available on digital pins 0 and 1, receiver and transmitter pins, respectively. The ATmega16U2 acts as a virtual com port on the computer by channeling serial communication over USB. USB COM drivers are included in the '16U2 firmware, so there is no need to install external drivers. Besides, the serial library of the software provides serial communication in the digital pins of the board. The microcontroller also supports SPI and I2C communication. The SPI and wire library can help with these communications, respectively.
The microcontroller ATmega 328 has a storage of 32KB, where the bootloader takes 0.5kb. It has 1 KB of EEPROM and 2KB of SRAM. Pin Mode (), digital Write (), and digital Read () allow for input or output on any of the 14 digital pins on the Uno. Each of the pins operates at 5V with a maximum current of 40mA. In addition to this, they have the internal pull-up of a register of 20-50k Ohms.
Some of the pins configurations of Arduino Uno are:
| Microcontroller Type | ATmega328P-8-bit |
| Operating Voltage | 5Volt |
| Suggested Voltage | 7-12Volt |
| Analog Input Pins | 6 (A0 – A5) |
| Digital I/O Pins | 14 (6 gives PWM output) |
| DC Current on 3.3V Pin | 50 mA |
| DC Current on I/O Pins | 40 mA |
| Flash Memory | 32 KB |
| SRAM | 2 KB |
| EEPROM | 1 KB |
| Frequency(Crystal Oscillator) | 16 MHz |
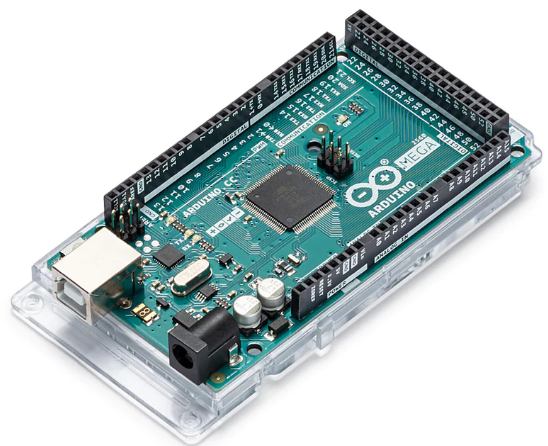
Arduino Mega is the microcontroller that is based on ATmegas 2560. It is the largest Arduino series with 54 digital input and output pins, among which 14 pins are used as PWM outputs. It has 16 analog inputs and 4 UARTs ports for serial communication. Additionally, it has a 16MHz crystal oscillator, USB connector, reset buttons, ICSP header, and power jack. It contains everything required for the microcontroller to operate. Arduino Mega is compatible with all designs for Arduino.
Technical Specification
| Microcontroller Type | ATmega2560 |
| Operating Voltage | 5Volt |
| Suggested Voltage | 7-12Volt |
| Analog Input Pins | 16 |
| Digital I/O Pins | 54 (14 gives PWM output) |
| DC Current on 3.3V Pin | 50 mA |
| DC Current on I/O Pins | 40 mA |
| Flash Memory | 256 KB |
| SRAM | 8 KB |
| EEPROM | 4 KB |
| Frequency (Crystal Oscillator) | 16 MHz |
The power pins of Arduino Mega include:
Each of the 54 pins can work as input and output pins using pinMode(), digitalWrite(), and digitalRead() functions.
Serial Pins: Used to receive and transmit the TTL serial data. Pins 0(RX) and 1(TX) connect to the corresponding pins of Arduino MegaUSB to the TTL serial chip.
Arduino Mega 2560 provides various options for communicating with computer devices. First, ATmega 2560 provides the 4 hardware UART for the TTL 5V serial communication. ATmega provides the virtual com port to the software on the computer. A serial library provides serial communication on any part of the Arduino Mega. Besides, it also supports I2C and SPI communications.
Arduino Micro is the microcontroller that is based on Atmega32U4. It consists of 20 digital input output pins, 12 analog pins, and 7 PWM outputs among 20 digital pins. The board also has a micro USB connection port, reset button, and ICSP header. The 16 MHz crystal oscillator in the Arduino Micro helps to synchronize the clock signal. A USB port helps to communicate the board with the computer. The board uses serial communication to interface with computer devices.
| Microcontroller Type | ATmega32U4 |
| Operating Voltage | 5Volt |
| Suggested Voltage | 7-12Volt |
| Analog Input Pins | 12 |
| Digital I/O Pins | 20 (7 gives PWM output) |
| DC Current on 3.3V Pin | 50 mA |
| DC Current on I/O Pins | 40 mA |
| Flash Memory | 32 KB |
| SRAM | 2.5 KB |
| EEPROM | 1 KB |
| Frequency (Crystal Oscillator) | 16 MHz |
The three functions, digitalWrite(), digitalRead(), and pinMode(), can operate the digital pins as input or output. The operating voltage of the board is 5Volt. Each pin can receive or supply a current of 40mA, and there is an internal pull-up resistor with a value between 20-50 kiloohms.
Serial Pins 0 (RX) and 1 (TX): The pins receive and transmit the serial TTL serial data using the ATmega32U4 microcontroller series.
TWI-Pins 2 and 3: It uses the wire library that supports TWI communication.
The pins can typically activate an interrupt, a value change, or a decreasing or increasing edge if configured.
The general dimension of Arduino Uno is 2.7" x 2.1", whereas the dimension of Arduino Micro is 1.88" x 0.7".
Arduino Uno has 12 I/O pins with 6 PWM pins and 6 analog pins, whereas Arduino Micro has 20 I/O pins with 7 PWM pins and 12 analog pins.
Arduino Uno has the processor ATmega328P, whereas Micro has the ATmega 32u4.mBoth have the Flash Memory of 32kb and EEPROM of 1kb, whereas the SRAM of Arduino Uno is 2 kb and that of Arduino mega is 2.5kb. Both controllers have USB connectivity, whereas Uno uses the Standard A/B USB port, whereas Micro uses Micro USB.
Finally, both Arduino boards support the serial communication SPI and I2C.
Initially, the size of Uno is 2.7" x 2.1", while Arduino Mega is of 4¨ x 2.1¨.
Second, Uno has 14 I/O pins and 54 I/O pins, with 15 PWM pins and 16 analog pins.
Arduino Uno has the process of type ATmega328P, whereas the Mega uses the processor ATmega2560.
Arduino Uno has a flash memory of 32kb and SRAM of 2kb, whereas the Arduino Mega has of 256 kb and 8kb respectively.
The EEPROM of Arduino mega is of size 4kb, whereas the size EEPROM of Arduino Uno is 1 kb.
Both have a clock frequency of 16MHz and an operating voltage of 5V.
Finally, both of the microprocessors support serial communication.
All of the Arduino microcontrollers can be programmed with Arduino software. Also, the microcontrollers have a pre-burned bootloader where the new codes are uploaded without an external hardware program. In the Arduino repository, the ATmega firmware source code is available.
The communication of Arduino is carried through a USB connection that works as the virtual com port for the software. In addition, Arduino IDE software has a serial monitor that helps the board to send and receive the data in text format. The software serial library allows communication on the digital pins of the Arduino boards.
Before selecting the proper Arduino boards for your project, you must consider various factors. The first factor is the pin configuration. If you have more output devices and need to use more I/O pins or Analog Pins, then Arduino Mega best suits you as it has comparatively more I/O pins than Arduino Uno and Arduino Nano.
While if you are conscious about the size of your circuit and, apart from this, you have a small number of external devices, then Arduino nano is the best choice as it reduces the overall cost of the whole project.
Arduino is the microcontroller that is used for rapid prototyping. Arduino is designed for beginners and is a starter package. Moreover, it does not apply to the harsh industrial environment as it lacks industry requirements. While if you are working with completed projects with high processing ability, you can go for Rasberry Pi.
Still, need help? Contact Us: support@nextpcb.com
Need a PCB or PCBA quote? Quote now


 Surface

