On the page "Wave Soldering VS Reflow Soldering", the meaning of wave soldering has mentioned, Wave soldering is to make the soldering surface of the plug-in board directly contact the high-temperature liquid tin to achieve the purpose of soldering. The high-temperature liquid tin maintains a slope, and a special device makes the liquid tin form a wave-like phenomenon, so it is called "wave soldering". The main material is solder bars.
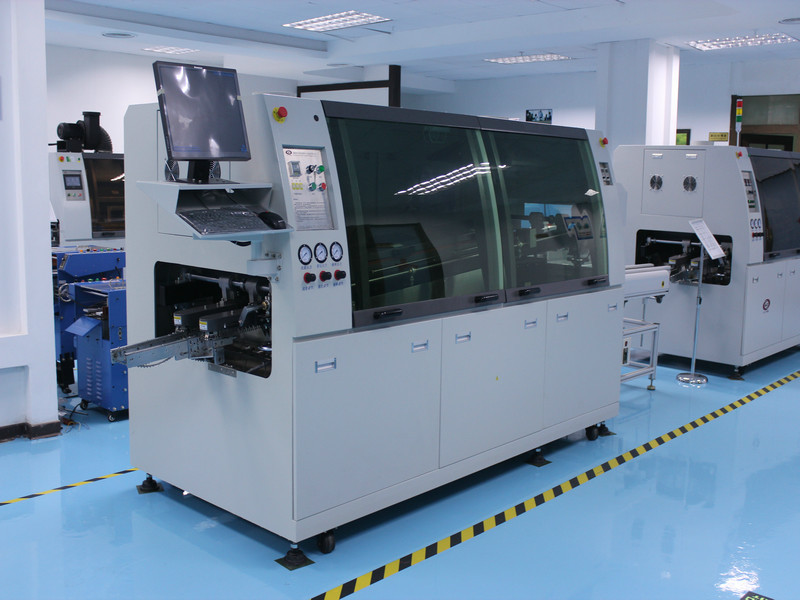
Process of Wave Soldering
After the circuit board enters the wave soldering machine through the conveyor belt, it will pass through a certain form of flux coating device, where the flux is applied to the circuit board by wave, foaming, or spraying. Since most fluxes must reach and maintain an activation temperature during soldering to ensure complete wetting of the solder joints, the circuit board must pass through a preheating zone before entering the wave trough. The preheating after the flux coating can gradually increase the temperature of the PCB and activate the flux. This process can also reduce the thermal shock generated when the assembly enters the wave crest. It can also be used to evaporate all the moisture that may be absorbed or the carrier solvent that dilutes the flux. If these things are not removed, they will boil at the peak of the wave and cause the solder to splash, or generate steam to stay in the solder to form hollow Solder joints or blisters. In addition, due to the larger heat capacity of double-sided and multi-layer boards, they require a higher preheating temperature than single-sided boards.
The wave soldering machine basically uses the heat radiation method for preheating. The most commonly used wave soldering preheating methods include forced hot air convection, electric heating plate convection, electric heating rod heating, and infrared heating. Among these methods, forced hot air convection is generally considered to be the most effective heat transfer method for wave soldering machines in most processes. After preheating, the circuit board is welded with a single wave (λ wave) or double wave (spoiler wave and λ wave). For perforated components, a single wave is sufficient. When the circuit board enters the wave crest, the direction of solder flow is opposite to the traveling direction of the board, which can generate eddy currents around the component pins. This is like a kind of scrubbing, which removes all the flux and the residue of the oxide film on it, and forms wetting when the solder joint reaches the wetting temperature.
>Get PCB quote
For hybrid technology assemblies, turbulence waves are generally used in front of the lambda wave. This wave is relatively narrow and has a high vertical pressure when disturbed, which allows the solder to penetrate well between the compact pin and the surface mount component (SMD) pad, and then use the lambda wave to complete the solder joint formation. Before any evaluation of future equipment and suppliers, it is necessary to determine all the technical specifications of the board to be soldered with wave crest, because these can determine the performance of the required machine.
Several typical process flow
A1.1 Single-machine wave soldering process flow
- a. Component lead forming a printed board with solder mask tape (as required)---insert components---install the printed board into the welding machine fixture---coating flux---preheating-- -Wave soldering---Cooling---Remove the printed board---Tear off the solder mask tape-Second-inspection---Si L welding---cleaning---inspection---put into the special transport box;
- b. Soldering mask tape on the printed board --- load the template --- insert the components --- blister --- cut the foot --- remove the printed board from the template --- install the printed board Welding machine fixture---coating flux---preheating---wave soldering (precision soldering flat wave and shock wave)---cooling---remove the printed board---tear off the blister film and resist Welding tape---inspection---re-welding---cleaning--inspection---put it in the special transport box.
A1.2 On-line wave soldering process flow
Mount the printed board on the fixture of the welder---manually insert components---apply flux---preheat---dip solder---cold cut---cut foot--- Brush cutting chips---spraying flux---preheating---wave soldering (finishing flat wave and shock wave)---cooling---cleaning---printed board separation from the welder-one inspection-- -Repair welding---cleaning---inspection---put it in the special transport box.
B1. Basic operating procedures of wave soldering machine
B1.1 Preparation
- a. Check whether the ventilation equipment equipped with the wave soldering machine is good;
- b. Check whether the timing switch of the wave soldering machine is in good condition;
- c. Check whether the tin bath temperature indicator is normal. Method: Adjust the temperature indicator up and down, and then use a thermometer to measure the temperature 10-15 mm below the surface of the tin bath to determine whether the temperature changes with it:
- d. Check whether the preheater system is normal.
- Method: Turn on the preheater switch to check whether it is heating up and the temperature is normal;
- e. Check the working condition of the foot cutter.
- Method: Adjust the height of the blade according to the thickness of the printed board and the length of the remaining component leads, then tighten and stabilize the blade holder, turn on the machine and visually check the rotation of the blade, and finally check whether the safety device is malfunctioning;
- f. Check whether the supply of compressed air to the flux container is normal;
- Method: Pour in the flux, adjust the inlet valve, and foam the flux after starting up, use the sample printed board to adjust the foam to 1/2 of the thickness of the board, and then tighten the intraocular pressure valve. Move this valve again and only open the air intake switch;
- g. After the above procedures are all normal, the required various process parameters can be preset to the relevant positions of the equipment.
Operation rules
- a. Wave soldering machine should select 1~2 trained full-time staff for operation and management, and can carry out general maintenance;
- b. Before starting up, the operator needs to wear roving gloves and take cotton yarn to wipe the equipment clean, and inject a proper amount of lubricant into the oil injection hole;
- c. The operator needs to wear rubber anticorrosive gloves to remove the waste and dirt around the tin tank and the flux tank;
- d. Do not store gasoline, alcohol, cotton yarn and other flammable materials around the equipment in the operation room;
- e. When the welding machine is running, the operator must wear a gas mask and at the same time wear heat-resistant and flame-resistant gloves for operation;
- f. Non-workers are not allowed to enter the wave soldering operation room casually;
- g. Smoking and eating food are not allowed in the workplace;
- h. Wear work caps, shoes and overalls when performing plug-in work.
Operation process of stand-alone wave soldering
Turn on the ventilation switch-Boot
- a. Turn on the power;
- b. Turn on the solder bath heater;
- c. Turn on the air inlet switch of the foam sprayer;
- d. When the solder temperature reaches the specified data, check the tin level, if the tin level is too low, add solder in time;
- e. Turn on the wave soldering air pump switch, and use a special fixture equipped with a printed board to adjust the pressing depth;
- f. Remove residual oxides on the tin surface, and add antioxidants after the tin surface is clean:
- g. Check the flux, if the liquid level is too low, add a proper amount of flux;
- h. Check and adjust the flux density to meet the requirements;
- i. Check whether the flux foaming layer is good;
- j. Turn on the preheater temperature switch and adjust to the desired temperature position; k. Adjust the angle of the drive rail;
- l. Turn on the conveyor switch and adjust the speed to the required value;
- m. Turn on the cooling fan;
- n. Install the welding jig into the guide rail;
- o. The printed board is loaded into the fixture, the board is tightly attached to the fixture slot with moderate force, and then the fixture is placed at the beginning of the conveying rail;
- p. Before the welding operation, a dedicated person will center the tilted components and verify the correctness of the centered components;
- q. The tall components must be reinforced before welding to fix them on the printed circuit board.
On-line wave soldering machine operation process
Operate in accordance with the procedures in B2.1 and B2.2 a-k in Chapter B2-Continue the operation of this machine
- a. Plug-in workers wear spun gloves as required. (If there are electrostatic sensitive devices, wear a conductive wrist strap) The plug-in worker should insist on waiting for the equipment to run in front of the work station;
- b. Adjust the transport speed according to the actual situation to match the welding speed;
- c. Turn on the cooling fan;
- d. Open the foot cutting machine;
- e. Place the fixture on the guide rail and adjust it to the size of the printed board required to be welded;
- f. Perform items P and q in B2.2;
- g. After the program is completed, you can turn on the travel switch of the wave soldering machine and the welding operation switch for inserting and welding.
Post-weld operation
- a. Turn off the air source;
- b. Turn off the preheater switch;
- c. Turn off the switch of the foot cutter; turn off the switch of the washing machine;
- d. Adjust the transport speed to zero and turn off the transport switch;
- e. Turn off the main power switch;
- f. Take out the cooled flux. After filtering, it can still be used after reaching the target. Wipe the container and spray port clean;
- g. Clean the wave soldering machine and fixtures.
Management in the welding process
- a. The operator must stick to his post and check the operation of the equipment at any time;
- b. The operator should check the quality of the welded plate. If the solder joints appear to be abnormal, if a board's virtual solder joints exceed 2%, the machine should be shut down for inspection immediately;
- c. Make timely and accurate original records of equipment operation and specific data records of solder joint quality;
The printed boards that have been soldered should be inserted into the special transport box separately, and they must not be pressed against each other, and they are not allowed to be stacked (if there are static sensitive components, you must use an anti-static transport box).

 NextPCB Capabilities
 PCB Assembly
 Layer Buildup
 SMD-Stencils
 PCB Design-Aid & Layout
 Mechanics
 Quality
 Drills & Throughplating
 Factory & Certificate
 PCB Assembly Factory Show
Certificate
PCB Assembly Factory Show
Certificate


 Surface

