NextPCB Capabilities
 PCB Assembly
 Process Capabilities
 PCB Design-Aid & Layout
 Quality
 Drills & Throughplating
 Factory & Certificate



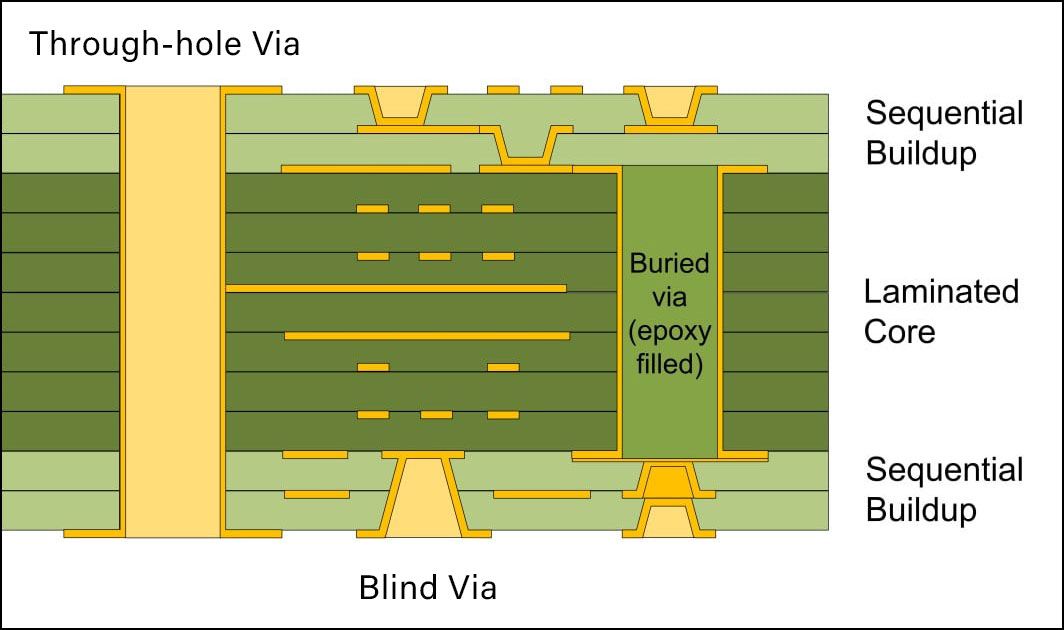
Choosing a via type is only half the job. Where you place vias, how many you use, and how you size them has a direct effect on signal integrity, thermal performance, and your board's final cost. This guide focuses specifically on that design decision layer — for a full breakdown of via types (through-hole, blind, buried, microvia, via-in-pad), see our complete guide to PCB via types.
The guidelines below reference NextPCB's own published manufacturing capabilities where a specific limit is relevant, so the numbers reflect what's actually achievable on a real order rather than generic industry rules of thumb.
Why Via Placement Matters
Every via adds parasitic capacitance and inductance to the net it sits on. On a low-speed board this is usually negligible. On high-speed digital, RF, or power-dense designs, poor via placement can degrade signal rise time, weaken power delivery, or create unwanted return-path discontinuities — problems that are far cheaper to avoid at the layout stage than to debug after fabrication.
Checking Via Parasitic Capacitance and Inductance
Rather than working through the parasitic capacitance and inductance formulas by hand, you can get an estimate directly from your via's dimensions using our free calculators:
- Via Parasitic Capacitance Calculator — estimate capacitance from pad diameter, antipad diameter, board thickness, and dielectric constant.
- Via Parasitic Inductance Calculator — estimate inductance and inductive reactance from via length and diameter.
As a rule of thumb: shorter, narrower vias have lower inductance; wider pads with larger antipad clearances reduce capacitance. The two often trade off against each other, which is why checking actual numbers for your stackup is more reliable than a rule of thumb alone.
Via Design Guidelines
Signal Integrity
- Place a ground via next to any signal via where the signal changes reference layers — this gives high-speed signals a short, low-inductance return path instead of forcing the return current to find a long detour.
- Keep the number of vias used by a differential pair equal on both legs, and place them symmetrically. Mismatched via counts introduce skew between the pair, which shows up as timing error at the receiver.
- Smaller via diameters generally mean lower parasitic capacitance but higher inductance; larger diameters are the reverse. Match the via size to whichever parasitic matters more for that specific net rather than using one size everywhere.
- Where possible, match the via's impedance discontinuity to the impedance of the trace it interrupts, to reduce reflections on critical high-speed nets.
- Keep drilled via diameters at or above 0.15mm on standard boards up to 1.2mm thick, and stay within a mechanically drilled via's practical aspect ratio — NextPCB's Advanced PCB service supports through-hole aspect ratios up to 20:1, while laser-drilled microvias should stay at or below a 1:1 aspect ratio (0.75:1 recommended) for reliable plating. See our full PCB manufacturing capabilities and advanced/HDI capabilities for the complete spec list.
Thermal and Power
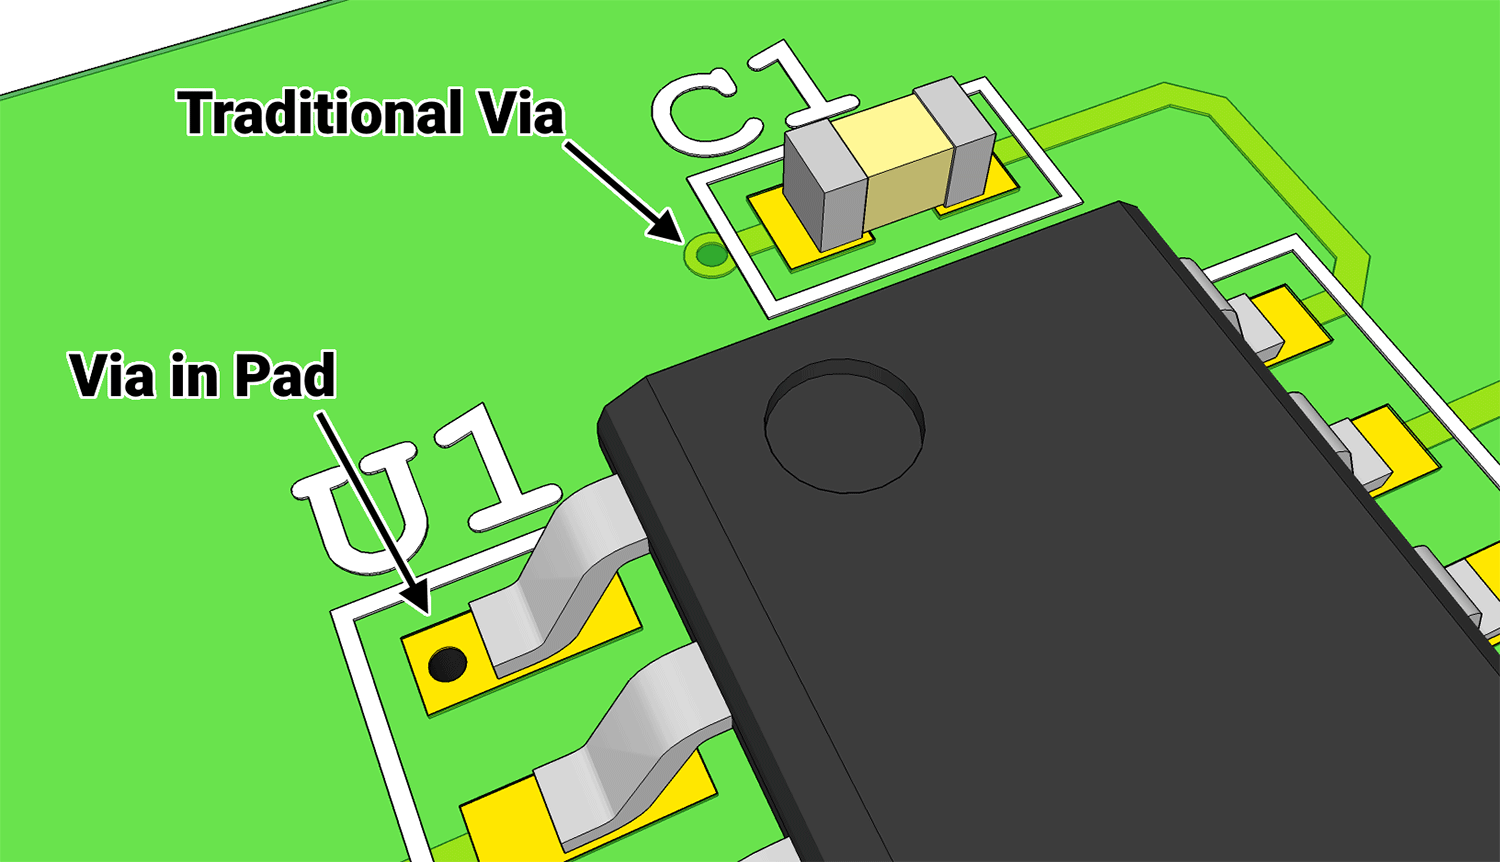
- For via-in-pad on BGA and micro-BGA solder joints, use filled vias — an open via under a solder joint lets solder wick away during reflow and creates a weak, voided joint. NextPCB's standard via-in-pad process supports filled via diameters up to 0.45mm; check our HDI and advanced capabilities page for current limits on your stack-up.
- Blind and buried vias generally have higher thermal resistance than through-hole vias. If a via's job is heat transfer rather than signal routing, a through-hole via is usually the better (and cheaper) choice. If you do need blind/buried vias, our manufacturing capabilities page lists the minimum plated copper thickness (≥20µm for mechanically drilled blind/buried vias) that keeps them reliable.
- Increasing a thermal via's pad size is a low-cost way to improve heat dissipation without adding more vias — keep the pad at least 0.1mm larger than the via diameter, in line with NextPCB's standard via pad size minimum, to leave room for the annular ring.
- Place power and ground vias close to the IC's power supply pins to keep the power delivery path short and low-impedance.

Routing and Cost
- Limit the number of via-in-pad instances where possible — each one adds parallel-plate capacitance, and in volume, filled/capped vias cost more than standard tenting.
- Keep via lengths as short as practical (e.g., with back-drilling on thick multilayer boards) to reduce both signal delay and parasitic inductance.
- Avoid mixing many different via sizes on one board purely out of habit — fewer distinct via sizes generally simplifies drilling and can reduce cost on tight-margin boards.
- Design to standard drill tolerances rather than unusually tight ones where you can — NextPCB's standard plated hole tolerance is ±0.075mm (±0.05mm for non-plated holes); tighter tolerances than this typically require Advanced PCB processing at extra cost. Full figures are on our PCB capabilities page.
How Via Choices Affect Manufacturing Cost

Via count and type is one of several factors that make up your board's final price, alongside layer count, material, and via protection method. As a general direction, blind and buried vias (and any design requiring extra lamination cycles) add the most cost; standard through-hole vias add the least. For an exact number on your specific design, get an instant quote — NextPCB's quoting platform prices via type and count automatically as part of your upload.
FAQ
Does via size affect signal integrity?
Yes. Smaller vias generally have lower parasitic capacitance but higher inductance, and vice versa for larger vias. Which one matters more depends on the net — use the capacitance and inductance calculators to check a specific via against your design's requirements.
Should I use blind or buried vias to reduce parasitic effects?
Blind and buried vias can shorten the via's electrical length, which helps with parasitic inductance, but they add lamination cycles and cost. For most designs, back-drilling a through-hole via to remove the unused stub achieves a similar signal-integrity benefit at lower cost than switching to blind/buried construction.
How many vias should a differential pair use?
Use the same number of vias on both legs of the pair, placed symmetrically. An unequal via count between the two legs is a common source of intra-pair skew that can degrade signal quality at high data rates.
What via aspect ratio is safe for reliable plating?
On standard through-hole vias, NextPCB's Advanced PCB service supports aspect ratios up to 20:1. For laser-drilled microvias, keep the aspect ratio at or below 1:1, with 0.75:1 recommended for the most reliable plating. Going beyond these limits increases the risk of incomplete copper plating inside the via barrel. See our advanced/HDI capabilities for full specifications.
Ready to Apply These Rules to Your Design?
Check your via settings with HQDFM · Get an Instant PCB Quote · Engineer Consultation
About the Author
Carmen Zheng, Content Creator at NextPCB
With over eight years of experience in China's PCB manufacturing industry, Carmen has built expertise spanning operations, technical support, and content creation in electronics manufacturing and EDA software. A UK native with a Master's degree in Electrical and Computer Engineering, she bridges technical and cultural gaps for NextPCB's global audience.