NextPCB Capabilities
Printed Circuit Boards
NextPCB Capabilities
Printed Circuit Boards
 PCB Assembly
 Layer Buildup
 SMD-Stencils
 PCB Design-Aid & Layout
 Mechanics
 Quality
 Drills & Throughplating
 Factory & Certificate
 PCB Assembly Factory Show
Certificate
PCB Assembly Factory Show
Certificate
Support Team
Feedback:
support@nextpcb.com


Introduction
The Raspberry Pi is a Small yet Strong computer that allows you to Create all sorts of physical computing projects powered by Python. With its built-in General-Purpose Input/Output (GPIO) pins, you can link with electronic components like LEDs, buzzers, buttons, and sensors to create interactive electronic builds. In this advice, we will stroll through how to set up a Raspberry Pi to work with actual tasks utilizing Python.
We'll overview the Raspberry Pi board itself and compare it to Arduino. Then we'll look at the necessary hardware and software to get set up. Next, we'll go over how to interact with physical components via GPIO and code some example projects, like building a motion-activated alarm system. By the end, you'll have the skills and understanding you need to start developing your own Python-powered physical computing projects on the Raspberry Pi.
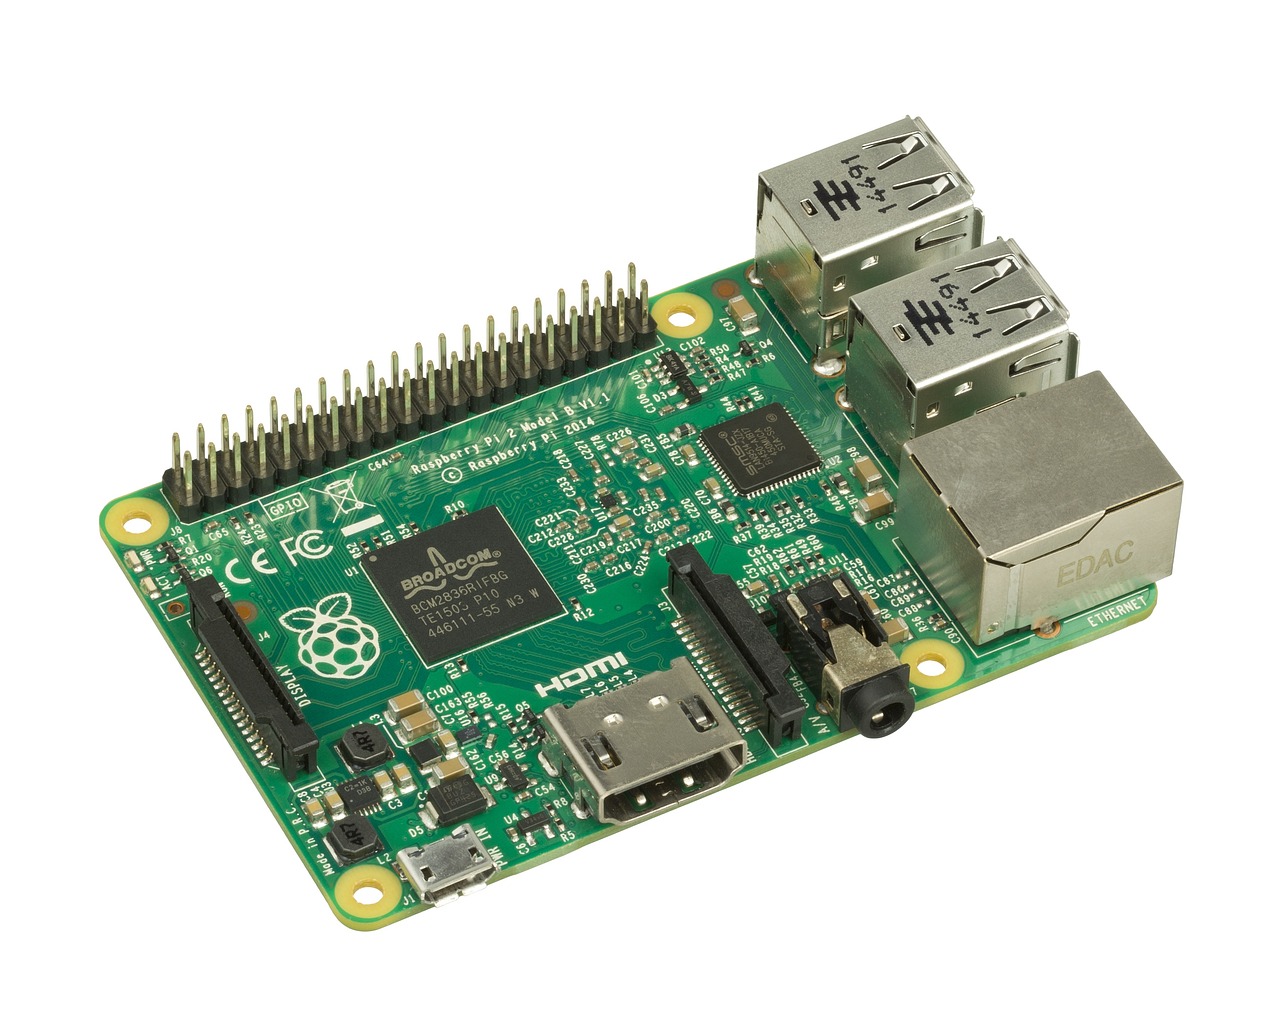
At the core of any Raspberry Pi actual processing project is the little single-board PC itself. The Raspberry Pi has a Broadcom framework on-chip with an ARM processor, memory, ports, and best of all - GPIO pins to connect with hardware.
A few critical specs of the Raspberry Pi 4 Model B, which we'll use here, incorporate a 1.5GHz quad-center processor, up to 4GB of Slam, double band 802.11ac remote LAN, Bluetooth 5.0, Gigabit Ethernet, USB 3.0 and USB 2.0 ports, HDMI and sound result. In any case, in particular for us, it has 40 GPIO pins that can be utilized for input/yield.
The Raspberry Pi runs a full Linux operating system and can be used as a general desktop system. But for physical computing, we'll be focusing on programming its GPIO pins using Python scripts. Overall, the Raspberry Pi is a powerful and compact computer well-suited for building all sorts of physical projects.
For physical computing projects focused on electronics and low-level input/output, the Raspberry Pi does compete with another popular platform - the Arduino. A few critical contrasts between the two:
Processing power: The Raspberry Pi has much more processing power than an Arduino, making it suitable for bigger projects that need more oomph under the hood. Arduino’s are simpler.
Operating system: The Raspberry Pi runs Linux, allowing you to use GUI desktop apps and programs. Arduino uses a much smaller non-OS environment built around C/C++.
GPIO pins: Raspberry Pi GPIO pins work at 3.3V logic levels vs 5V for Arduino, so components need level shifting. Arduino has fewer but fewer specialty pins too.
Programming language: Python is a major language for Raspberry Pi, while Arduino is mainly programmed with C/C++. Python is friendlier but less optimized.
Cost: A basic Raspberry Pi setup is a bit more expensive than an Arduino kit, though it has much more power under the hood.
So, in summary, Raspberry Pi gives you a full Linux computer for complex projects, while Arduino is simpler for basic electronics tasks. We'll focus here on doing physical builds with the Raspberry Pi and Python.
To start, you'll require a Raspberry Pi board, a SD card stacked with Raspberry Pi operating system (the default working framework), a power supply, Keyboard, mouse and screen.
To begin with, download and install Raspberry Pi operating system onto the microSD card utilizing a card essayist on your fundamental PC. Embed the microSD card into the Raspberry Pi and attach the power supply. Plug a USB keyboard, mouse and HDMI monitor into the Pi.
Once booted up, you may want to perform some initial configuration tasks like expanding filesystem, enabling SSH, setting WiFi and so on. This allows remote access for configuration and programming of physical builds without needing a keyboard/monitor attached.
In addition to the Raspberry Pi itself, here are some core hardware components needed for basic physical computing projects:
Breadboard: A solderless prototyping board for connecting components.
Jumpers: Used to connect components through breadboard holes.
Resistors: Used to limit current for components like LEDs. Common types are 220/270/330/470 ohms.
LEDs: Simple light emitting diodes to use as output indicators.
Tactile buttons: Physical buttons to use for input.
Buzzer: A small piezo buzzer for audible output.
Battery pack: To power our projects without wall power.
All of these common electronics components are inexpensive and available online in starter packs. You can then choose other optional sensors, motors, and displays to expand project capabilities.
Some other helpful but optional hardware to consider including:
Motion sensor: PIR sensor detects movement for security projects.
Light sensor: LDR sensor measures ambient light levels.
Temperature/humidity sensor: DHT11/22 adds environmental sensing.
LCD/OLED display: Shows output without monitor.
Servos: Small motors to build robotic creations.
Relays: Switch high-voltage loads from 3.3V GPIO pins.
Camera module: Add image/video capabilities.
GPS module: Track location for scout/hiking projects.
The sky is truly the limit when it comes to input/output options! Consider what types of inputs you want your builds to sense or what outputs you want to control.
In terms of software, the Raspberry Pi desktop environment comes preloaded with tools you'll need:
Python: The main programming language we'll use for GPIO control and projects.
Mu editor: Beginner-friendly code editor that supports Python.
Terminal: For command line access and debugging scripts.
We'll also want to install a few optional Python packages to enhance projects:
RPi.GPIO: Library that extends Python's GPIO access.
pytz: For working with timezones and timestamps.
Adafruit_DHT: Driver for DHT temperature/humidity sensors.
Most packages can be easily installed via the command line by running pip install packagename. This will download and setup any required dependencies.
For software setup, connect to the Raspberry Pi either via VNC remote desktop or SSH to configure remote access. Then install any optional Python packages needed for your target project components.
For hardware setup, connect a breadboard to the Raspberry Pi GPIO pins using jumper wires. Place components on the breadboard and connect to the appropriate GPIO pins using your schematic as a guide. Finally add a battery pack for portable power.
Your Raspberry Pi is now ready for physical Python projects!
To run and test Python scripts on the Raspberry Pi, open up a terminal window either on the Pi locally or through SSH. Explore the catalog containing your code records.
Then simply run your Python program file using python filename.py. This will execute the code and you should see the script perform the programmed tasks using the GPIO pins and hardware.
You can also run interactive Python mode to test things out more rapidly using python3 at the terminal prompt. Import libraries, set pin modes, call functions, and change variables to test logic.
For writing and editing Python code, we'll use the beginner-friendly Mu editor installed on the Raspberry Pi by default. To open Mu, click on its icon or run mu-editor at the terminal.
Mu has syntax highlighting, code checking, and debugging tools built-in. It also seamlessly connects to the Python REPL for live testing of snippets. Simply write, save, and run code files directly from within Mu on the Pi itself.
You can also edit Python projects remotely over SSH from your main computer instead of using the Pi monitor directly.
After enabling SSH, download and install an SFTP client like FileZilla on your computer. Use it to connect to the Pi's IP address, navigate to where your code is stored, and edit/save files remotely. Then still run scripts via SSH terminal.
It's good practice to keep all your Python coding projects organized within a main directory. On the Raspberry Pi, create a new folder called python-projects within your user's home folder to store code and components.
Inside, make additional sub-folders for each discrete project. This keeps files organized and easy to back up/transfer between Pis as your skills and projects grow more advanced over time.
Now that the Pi is set up, let's look at how to connect up and control common electronics using Python and GPIO pins.
There are several basic electronic components that are useful to know about when building physical computing projects with the Raspberry Pi:
Resistors: Resistors help control the flow of electricity in a circuit. They are used to limit the current going to components like LEDs so they are not burnt out. Common resistor values for LEDs are 220-330 ohms.
LEDs: Light emitting diodes (LEDs) light up when electricity flows through them and can be used as indicator lights. LEDs only work in one direction so the longer positive leg must be connected to voltage.
Buttons: Tactile buttons provide an on/off input when pressed or released. They have two contacts - one for each button state. Momentary push buttons require continual pressure.
Buzzer: A buzzer is a simple sound generator that can be activated by a pulse of electricity to produce tones. It works similarly to an LED.
Sensors: Devices like PIR motion, light, temperature/humidity sensors detect inputs from the physical world that can trigger a response in code.
Display: Small LCD or OLED screens are useful for showing responsive output without needing a monitor.
Motors: Servos and DC motors allow for motion output like robotic movements when controlled by the Raspberry Pi.
This covers some of the basic electronic components that are commonly interfaced with the Raspberry Pi for physical inputs and outputs in projects. Understanding how they work will help when wiring up circuits.
The Raspberry Pi has 40 GPIO pins laid out along two rows of connectors that can be configured for input/output. We'll use these to communicate between our Pi scripts and the physical world.
Pins are numbered starting at Pin 1 in the top left, with odd numbers along the top row and even on bottom. Pins are 3.3V logic level, so components usually need a resistor.
Buttons provide simple on/off input. Connect one side of the button to a 3.3V GPIO pin and the other side through a pull-down resistor to GND.
In Python, import RPi.GPIO and set the pin as an input. Use GPIO.input(pin) to check if the button is pressed and trigger actions. Buttons are great for interfaces like turning something on/off.
Connect one long leg of the LED (the anode) to a GPIO pin. Make sure to add a resistor (usually around 220-330 ohms) between the pin and the LED to limit the current. Then connect the short leg (the cathode) directly to the ground.
Set the pin as a result and use GPIO.output(pin, GPIO.HIGH) to turn the Drove on, GPIO.LOW to switch it off. Control Drove state from your Python code for status sign.
A buzzer operates the same as an LED, connecting one leg through a resistor to a GPIO pin set as an output. Trigger tones of different frequencies by pulsing the pin HIGH/LOW at timed intervals. Great for alarms!
Use a Passive Infrared (PIR) sensor module's output pin connected to a GPIO input pin. When motion is detected, it will pulse the pin HIGH. Then use a GPIO wait function to detect the pulse and trigger code accordingly. Helpful for motion-activated projects.
By coding the state changes and responses to these common components in Python, you can build all sorts of interactive electronic builds and devices operating through the Raspberry Pi. Additional sensors like light and temperature expand the types of inputs you can detect too.
For this project, we'll trigger an alarm of flashing LEDs and beeping when motion is detected by a PIR sensor.
Connect PIR sensor output to GPIO 18 (input pin)
Connect LED anode to GPIO 17 through 220Ω resistor
Connect LED cathode and buzzer leg to GPIO 27through resistor
Connect other sides of LED, buzzer and PIR GND to ground
Import GPIO and time libraries. Set pins 17 and 27 as outputs, 18 as input.
Check if motion detected on pin 18
If so, turn on pin 17 (LED) and play tone on 27 for 1 second
Then wait 5 seconds
Turn off pins
Repeat loop infinitely
Now when anything moves within the sensor's range, the LED will flash and buzzer beep for 5 seconds as an alarm. You've interfaced multiple components to create an interactive security device!
To expand this further, log timestamped detections to file, add LCD display, connect to WiFi and trigger notifications. You could even add a camera module to record video on detection.
The possibilities are endless based on your imagination and hardware additions. With each new project, your skills at physical computing with the Raspberry Pi will grow.
This guide showed you how to transform a Raspberry Pi into a platform for developing all kinds of cool physical computing projects with Python. By setting up your dev environment properly, learning to interface with basic electronics, and working through some sample builds, you now have the basic skills and knowledge to turn your ideas into real working prototypes. The possibilities are endless with a Raspberry Pi - the rest is up to your imagination! Now go build something awesome.
- How to turn a Raspberry pi into a Router
- How to use USB Audio Device and Microphone with Raspberry Pi Zero W?
- Free PCB Assembly Offer is Now Live: Experience Reliable PCB Assembly from HQ NextPCB
- HQ NextPCB Introduces New PCB Gerber Viewer: HQDFM Online Lite Edition
Still, need help? Contact Us: support@nextpcb.com
Need a PCB or PCBA quote? Quote now


 Surface