NextPCB Capabilities
Printed Circuit Boards
NextPCB Capabilities
Printed Circuit Boards
 PCB Assembly
 Layer Buildup
 SMD-Stencils
 PCB Design-Aid & Layout
 Mechanics
 Quality
 Drills & Throughplating
 Factory & Certificate
 PCB Assembly Factory Show
Certificate
PCB Assembly Factory Show
Certificate
Support Team
Feedback:
support@nextpcb.com


Introduction
The Raspberry Pi is a popular single-board computer that can be used for a wide range of projects. One of the key features of the Raspberry Pi is its ability to connect to the internet via WiFi, which allows for greater flexibility and convenience. In this article, we will talk about how to configure WiFi on Raspberry Pi and the steps of configuring WiFi on your Raspberry Pi. Configuring WiFi is among the initial tasks you'd likely want to accomplish with your Raspberry Pi. The most common three methods for setting up WiFi on your Raspberry Pi, provide both Raspberry Pi OS desktop and server versions. Additionally, we'll provide instructions on configuring WiFi for a headless Raspberry Pi, ensuring comprehensive coverage for various setups.
To establish a wired internet connection for your Raspberry Pi, simply link it to the rear of your network router using an ethernet or RJ45 cable. Upon connection, you should observe the network LED on your Raspberry Pi blinking. In most scenarios, your wired internet connection will be operational, assuming your router has DHCP enabled. DHCP, which stands for Dynamic Host Configuration Protocol, assigns IP addresses to devices connecting to your router. To activate DHCP, access your home router's management console using another computer that is already connected. This is typically done by entering your router's IP address into the address bar of any internet browser.
Get Free Custom Raspberry Pi Assembly
To establish a WiFi connection, it's essential to have a WiFi module for your Raspberry Pi. The good news is that all Raspberry Pi models from the Raspberry Pi 3 Model B (2016) onwards come equipped with on-board WiFi. However, if you have an older model or if the on-board WiFi module is not operational, you'll need to use an external USB WiFi adapter. When selecting a WiFi adapter, it's crucial to ensure there is proper driver support. For instance, opting for WiFi adapters with the RTL8192cu chipset is advantageous as they seamlessly integrate with Raspberry Pi OS.
Another factor to consider is power consumption. WiFi operations can demand a significant power supply, especially during data-intensive transmissions. For older Raspberry Pi models, it might be necessary to use an external power source, such as a powered USB hub, to adequately power the WiFi adapter. For more in-depth guidance on choosing a suitable USB WiFi adapter, refer to the information available on this page on eLinux.org. They also provide a list of WiFi adapters known to be compatible with the Raspberry Pi.
Setting up your Raspberry Pi's WiFi connection with the Raspberry Pi Imager is a quick and easy process. Here's how to do it:
In this process, if you want, you can also set other settings like enabling SSH, setting hostname and setting password etc. If you are going to do this on Raspberry Pi in headless mode, it would be a good idea to use "Raspberry Pi Imager". You don't need to do any more work, you just need this tool and you can do some setup by using Raspberry Pi in GUI mode or headless mode, both of which are very easy to use.
While using Raspberry Pi Imager is the easiest way to configure your Pi's Wi-Fi, there are other methods you can use, especially providing flexibility based on your preferences and requirements. Here are some additional approaches like : Configure WiFi with Raspberry Pi OS GUI, Configure WiFi from Command Line with Raspi-Config and Configuring WiFi on a Headless Raspberry Pi. Let us understand all these methods one by one to enable wifi on raspberry pi.
If your Raspberry Pi OS is already installed, or if you didn't use the Raspberry Pi Imager options for WiFi configuration, you can set up your WiFi connection using the desktop interface with the following steps.
If you're booting up your Raspberry Pi for the first time and haven't configured anything through Raspberry Pi Imager or other methods, you'll encounter the "Welcome to Raspberry Pi" wizard. This wizard prompts you to set up essential configurations for your system. During this initial setup, the wizard will guide you through configuring the country, keyboard layout, and creating a new user. Importantly, you'll also be prompted to configure your WiFi connection. This is a straightforward process, and you shouldn't skip this step.
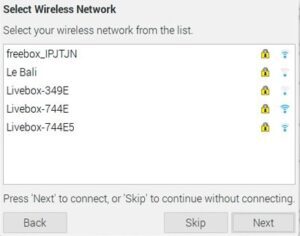
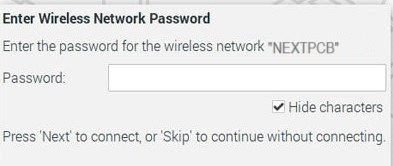
After setting up the basic configurations, you'll see a window that allows you to select your wireless network. In this window, you can choose your WiFi network from the list and enter the password. This step ensures your Raspberry Pi connects to the internet wirelessly. Taking advantage of this welcome wizard is the easiest way to configure WiFi on a new Raspberry Pi OS with Desktop. Make sure to follow through with the steps, and you'll have your Raspberry Pi connected to your WiFi network in no time.
Choose your WiFi network's name (SSID) from the provided list and click on "Next." Afterward, on the subsequent screen, enter the password associated with the selected WiFi network.
After a brief moment, your Raspberry Pi will establish a connection to your WiFi network.
The Raspi-Config tool allows you to configure your Raspberry Pi's WiFi directly from the command line. This is a convenient option if you prefer to avoid the graphical user interface or are working remotely through SSH. Here's how to Configure WiFi from the Command Line with Raspi-Config.
Open terminal and type the command:
sudo raspi-config
Navigate to System Options and then select Wireless LAN.
Type your SSID and your password.
Close the tool. In a moment, your Raspberry Pi will be successfully linked to the wireless network you selected. I hope this section will be helful to raspberry pi command line wifi setup.
Free Components Worldwide Shipping
Setting up WiFi on a headless Raspberry Pi can be slightly more complex than on a Pi with a monitor. What is Headless Raspberry Pi? - We want to run a headless Raspberry Pi without a monitor, keyboard, or mouse.
Enable SSH (Secure Shell)
What is SSH? - SSH allows you to use an internet connection to remotely perform terminal commands on the Raspberry Pi from your primary computer.
To activate SSH on a headless Raspberry Pi, create a file named "ssh" without any extensions to the SD card's boot partition from another computer. This instructs the Raspberry Pi to enable SSH when it boots. The file's content is irrelevant.
Remember: If you have not yet set up safe passwords for all users, do not connect your Raspberry Pi directly to a public network. Hackers may gain access to your device. It would be better if you use a security key instead of a password.
However, there are several methods available for Configuring WiFi on a Headless Raspberry Pi, each with its own advantages and disadvantages. Here are some options to consider:
1. Using Raspberry Pi Imager:
In this article we have already configured WiFi using Raspberry Pi Imager. By using the advanced options of Raspberry Pi Imager, we can set up a headless Raspberry Pi and that too very easily.
2. Editing wpa_supplicant.conf:
sudo nano /etc/wpa_supplicant/wpa_supplicant.conf
network={
ssid="[your_network_name]"
psk="[your_network_password]"
key_mgmt=WPA-PSK
}
sudo systemctl restart networking
3. Configuring with a temporary Ethernet connection:
You can connect raspberry pi to wifi easily by using the above methods.
Once you've configured your Raspberry Pi's WiFi connection, it's crucial to test it and confirm it's working properly. Here are a few methods to check your connection:
1. Graphical User Interface (GUI):
2. Command Line:
ip addr show
3. Ping Test:
ping [your_router_ip_address]
4. Online Speed Test:
5. Internet Connectivity:
By following these methods, you can quickly and easily confirm your Raspberry Pi's WiFi connection is functioning properly. If you encounter any issues, try restarting your Pi and router or double-checking your network configuration settings.
In conclusion, configuring WiFi on your Raspberry Pi opens up a world of possibilities for seamless connectivity and expanded functionality. From the simplicity of a wired Ethernet connection to the versatility of wireless setups, there are various methods to suit different preferences and scenarios. The Raspberry Pi Imager stands out as an accessible tool for users of all experience levels, providing an easy way to set up WiFi during the initial system configuration. Additionally, the graphical user interface (GUI) of the Raspberry Pi OS streamlines the process, allowing users to connect to WiFi networks effortlessly.
For those who prefer command-line interfaces, the Raspi-Config tool provides a robust option to configure WiFi settings. The flexibility to perform these configurations on a headless Raspberry Pi adds to the adaptability of the platform. The testing phase is crucial to ensure a successful WiFi connection, and users can be reassured that even on black-and-white screens, tools are available for a seamless setup experience. In essence, whether you're a beginner exploring the world of Raspberry Pi or an advanced user looking for efficient ways to configure WiFi raspberry pi, the variety of methods presented in this guide ensures that there's an approach suitable for every user.
- How to connect your Raspberry Pi to your computer via Ethernet
- Raspberry Pi 4 vs Raspberry Pi 3B+
- Free Worldwide Shipping on Over 600,000 Electronics Components with HQ Online
- Free PCB Assembly Offer is Now Live: Experience Reliable PCB Assembly from HQ NextPCB
- HQ NextPCB Introduces New PCB Gerber Viewer: HQDFM Online Lite Edition
Still, need help? Contact Us: support@nextpcb.com
Need a PCB or PCBA quote? Quote now


 Surface