Support Team
Feedback:
support@nextpcb.com
Image source: https://www.raspberrypi.com/news/introducing-noobs/
NOOBS or New Out Of the Box Software is an application used to write an operating system (OS) for the Raspberry Pi. It was designed to simplify the process of setting up a Raspberry Pi, especially for users who may be new to the world of single-board computers. NOOBS was introduced to provide a user-friendly solution for installing different operating systems on the Raspberry Pi without the need for advanced technical skills.
NOOBS was officially introduced in June 2012 by the Raspberry Pi Foundation. The Raspberry Pi, a credit-card-sized single-board computer, had gained popularity for its affordability and versatility. However, setting up the operating system on the Pi had been a somewhat complex task for beginners. NOOBS aimed to simplify this process and make it more accessible to a broader audience.
Over time, NOOBS became complemented by another tool, Raspberry Pi Imager. While NOOBS continued to offer a menu-based installation with offline capabilities, Raspberry Pi Imager focused on a streamlined process for writing a single operating system to an SD card, catering to users who preferred a quicker and more direct approach.
While the Raspberry Pi Foundation now recommends the Raspberry Pi Imager instead of NOOBS, a lot of users still prefer to use it. Here are some notable features of NOOBS.
In contrast, here are the features of Raspberry Pi Imager.
a. Streamlined OS Installation- Raspberry Pi Imager focuses on simplifying the process of installing a single operating system on the Raspberry Pi. It provides a more streamlined experience compared to NOOBS, making it an excellent choice for users who have a specific OS in mind.
b. Online OS Selection - Unlike NOOBS, Raspberry Pi Imager requires an internet connection during the installation process. It downloads the selected operating system directly from the internet, ensuring that users get the latest version.
c. Faster Installation Process - Raspberry Pi Imager tends to have a faster installation process compared to NOOBS. This is because it downloads the selected OS directly and writes it to the SD card without the need for an intermediate menu system.
d. Operating System Variety - Raspberry Pi Imager supports a wide range of operating systems, including the official Raspberry Pi OS and various third-party distributions. Users can choose from different options based on their project requirements.
e. Cross-Platform Compatibility - Raspberry Pi Imager is available for multiple platforms, including Windows, macOS, and Linux, making it convenient for users with different operating systems on their personal computers.
The choice between NOOBS and Raspberry Pi Imager depends on the user's preferences, level of experience, and the specific needs of their project. NOOBS is well-suited for beginners who want a user-friendly interface and the flexibility to experiment with different operating systems offline. On the other hand, the Raspberry Pi Imager is ideal for users who have a specific OS in mind, prefer a faster installation process, and are comfortable with an online OS selection approach.
First off, download the latest version of NOOBS to your computer. Then, prepare an SD card of at least 16 GB. As already mentioned above, the Raspberry Pi Foundation now prefers the Raspberry Pi Imager to burn OS to the SD card rather than NOOBS. This is why you won’t find the NOOBS installer anymore on the official website. However, a number of users still support it and still provide updates for it.
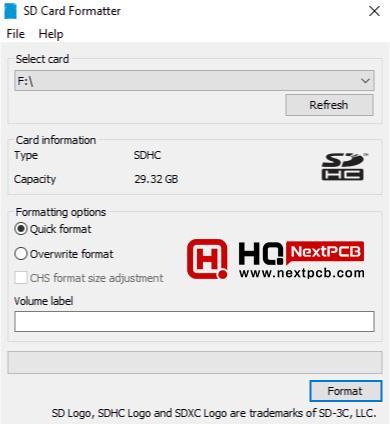
Before you can write NOOBS to the SD card, you must format it into the FAT filesystem. Formatting the SD card on your Windows or MacOS is not guaranteed to work. You need a third-party application to do the job. For example, you can download the SD Card Formatter application that readily formats your SD card to FAT.
To format using an SD Card Formatter, just select the location of the SD card mounted on your computer. It will show what type of card you have and its capacity. Then choose “Quick format” under “Formatting options”. You can also write a volume label but this is optional. After that, click format to start formatting.
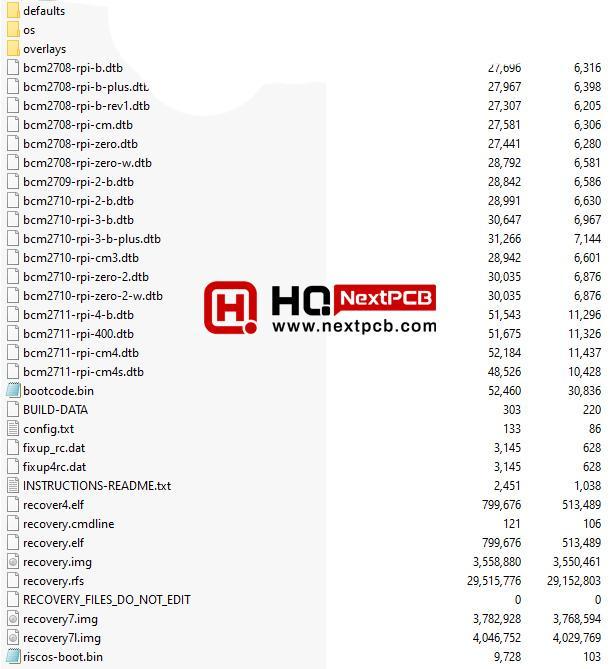
Once you have the formatted SD card, the next step is to just copy and paste the downloaded NOOBS to your SD card. The NOOBS folder should look like this:
Copying and pasting in Windows and Linux should be straightforward. Just highlight all files using CTRL+A, copy using CTRL+C then paste to the SD card root location using CTRL+V.
For MacOS users, select all files using Command+A, copy using Command+C, and then paste to the SD card root location using CTRL+V.
If you are a Linux user, who likes to use the terminal, just do the following command:
cp -a /source/. /dest/
Replace /source/ here with the location of the NOOBS folder in your computer and the /dest/ with the location of the mounted SD card. For example:
cp -a /home/noobs/ /media/roland/disk
It may take some time to copy the NOOBS files to your SD card as it is quite large.
After saving the NOOBs content into the SD card, remove it from your host computer and plug it into your Raspberry Pi. Plugging the SD card backwards won’t fit so you don’t have to worry if you mounted it incorrectly.
Now that you inserted your SD card into your Raspberry Pi, apply power to it, then connect it to a monitor. Don’t forget to attach a USB mouse and keyboard. Although the touchscreen may work, it may not be properly calibrated yet and is hard to use.
If after powering up there is nothing on the screen, check the LEDs on the Raspberry Pi board. A blinking red LED means the power supply is not providing enough voltage. A blinking green LED means there is something wrong with reading the data from the SD card.
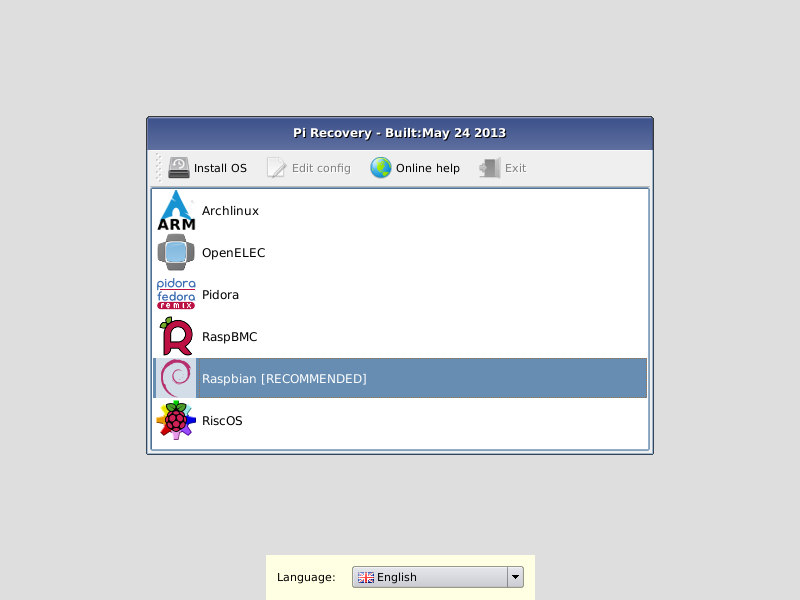
Once the Raspberry Pi boots up, you will come across the select OS screen. Depending on the NOOBS version you downloaded, the OS options will be Raspberry Pi OS or LibreElec. Then the writing process starts. After the OS is written successfully, you’ll need to configure the Raspberry Pi for first use.
First, NOOBS will ask you to set your country, language, and time zone. This will help automatically set the clock according to your location.
Next, you will need to provide your username and password. These will be your login credentials every time you start using the Raspberry Pi either through GUI or SSH. Make sure to use a secure password! As a rule of thumb, never use a password that can be found in a dictionary. This is because hackers often use the dictionary in brute-force attacks. I recommend using a password generator and then storing your password somewhere where only you know where.
After that, you will be asked to adjust your screen. Then you need to select a WiFi connection.
Finally, the Raspberry Pi is now ready to use with your preferred OS.
Once the OS boots and you are on the desktop, I recommend opening the terminal (that’s the third icon from the Raspberry Pi logo on the upper left), and then running the following commands:
sudo apt update
sudo apt upgrade
This will update the Raspberry Pi package index and provide the system with the most recent information about available packages from the repositories. This means the system will download all the necessary updates it needs.
One of the many features of NOOBS is a recovery mode that allows users to reinstall or update the operating system on their Raspberry Pi without starting the installation process from scratch. The recovery mode is a helpful feature in troubleshooting issues or updating the software on your Raspberry Pi. Here are the steps to use NOOBS recovery mode:
You'll need a display connected to your Raspberry Pi via HDMI, as well as a USB keyboard and mouse for navigation.
NOOBS has its own highs and lows. On the plus side, NOOBS makes installation easy especially for beginners. In addition, the customization options and installation without the need for an internet connection provide flexibility to users with specific needs. The recovery mode feature is another advantage as it allows users to update the existing OS without starting from scratch.
On the minus side, NOOBS consumes a huge amount of storage space on the SD card. Also, some advanced users may find NOOBS limiting, as there are things during installation that they might prefer to control manually.
Again the choice to use NOOBS depend on the type of user. Beginners might prefer to use it because it is user-friendly while advanced users might not like it due to the limitations it imposes.
- How to turn a Raspberry pi into a Router
- How To Build Physical Projects with Python on the Raspberry Pi
- Free PCB Assembly Offer is Now Live: Experience Reliable PCB Assembly from HQ NextPCB
- HQ NextPCB Introduces New PCB Gerber Viewer: HQDFM Online Lite Edition
Still, need help? Contact Us: support@nextpcb.com
Need a PCB or PCBA quote? Quote now
|
Dimensions: (mm) |
|
|
Quantity: (pcs) |
|
|
Layers: |
Thickness: |
|
|
|